10개 이상의 통합 가이드
직접 지불
지불금을 귀하의 지갑으로 직접 이체합니다(고객의 돈을 보관하지 않음).
KYC 없음
플러그인 사용을 시작하기 위해 KYC를 완료할 필요는 없습니다. 프로세스 중에 타사 계정이 없으며 자신의 지갑을 사용하십시오.
제한 없음
무제한으로 요청을 생성할 수 있습니다.
전 세계에서 Cryptocurrency 수락
사용자에 대한 국가 제한은 없습니다. 이 플러그인은 전 세계에서 사용할 수 있습니다.


모든 사람 은 암호화폐 결제를 수락할 수 있습니다.
간단합니다
최소 수수료
암호화 및 피아트 머니
시작하는 방법
In this article we will walk you through integrating Plisio into your Bigcommerce Store, as well as summarize some of the benefits of accepting cryptocurrencies. We’ve also prepared a guide for you on how to integrate a cryptocurrency payment into your website.
Now that we've discussed the benefits of accepting Cryptocurrency and choosing Plisio, let's take a look at how to integrate Plisio into Bigcommerce.
What we expect from the integration:
There are several ways of integrating Plisio into the Bigcommerce platform. While we’re on it, we want to make sure that all of our integrations meet a few requirements, and also warn you about some pitfalls.
- We would like to keep all of our orders inside of Bigcommerce’s platform. This includes using Bigcommerce’s checkout option to securely generate the order, collect the buyer’s info, calculate shipping costs and taxes, offer discounts or coupon codes, etc.
- We would also want your customers to be able to review their order history that will be kept in our Bigcommerce store.
- We want to keep the “Pending Payment'' status of your order until we can manually verify that we have received the crypto payment. This will allow us to make sure that all Blockchain confirmations are received before changing the order status to “payment received”.
- We want to be able to use our standard Shipping and Bookkeeping integrations for Bigcommerce, without requiring any additional plugins or software to add Plisio to our store.
The pitfalls:
- One of the Bigcommerce’s cons is that they do not offer any cryptocurrency payment options for merchants. This can be resolved with a custom code that will allow you to integrate your own Payment Gateway into the Checkout process.
- Unfortunately, Bigcommerce's new Stencil Theme does not allow merchants to directly customize or add code/scripts to the checkout process. They have mentioned adding the customization option in the future, but for now it is on hold. So we’ve got to get creative to get around this.
- We’ll need to be able to securely send the order information such as the order ID and the Order Total (Price) to the Plisio Platform while making sure there are no wrong order details sent.
Our Two Integration Options for Bigcommerce
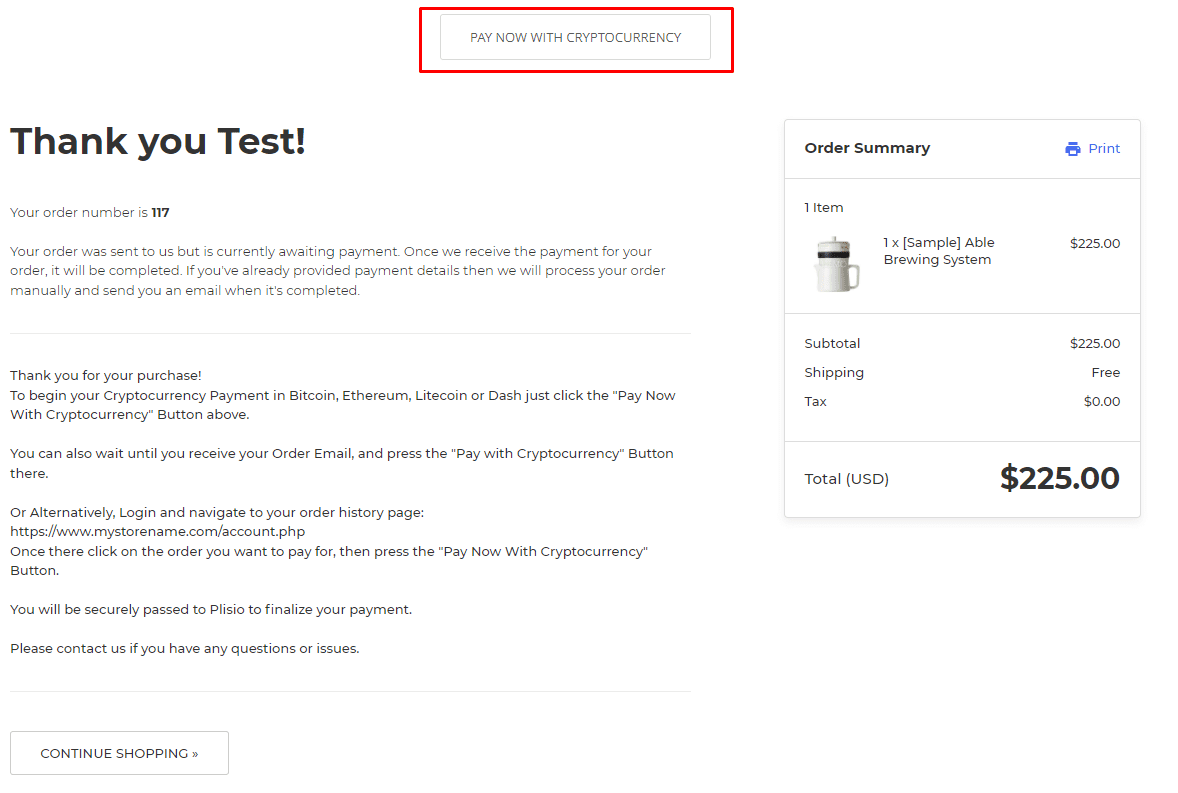
Option #1: Install a "Pay With Cryptocurrency" Button to the Order Confirmation Page, allowing the customer to make payment while checking out.
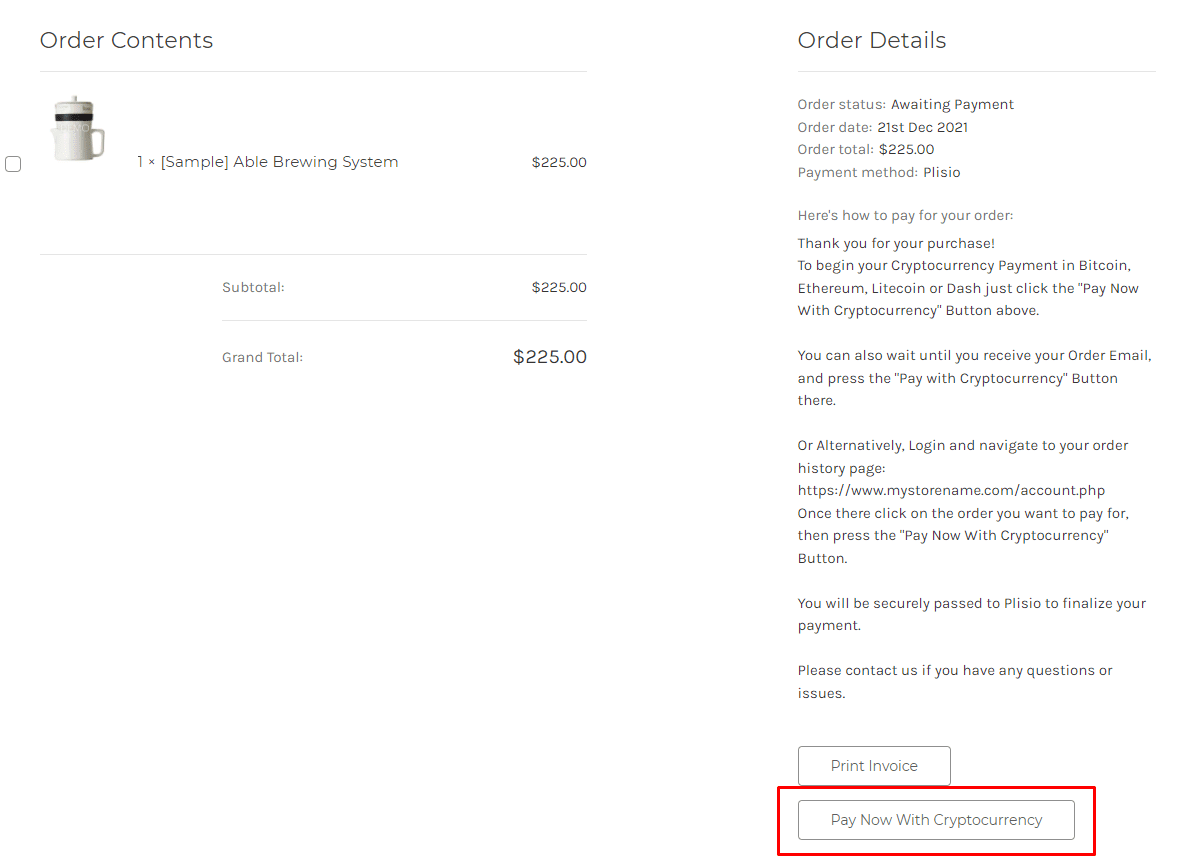
Option #2: Or install a "Pay With Cryptocurrency" Button to the Customer Dashboard, so that they can pay from their order history page.
In this guide, we will show you how to integrate these two options: Although you will only need the option #1, the other option suggests a back-up in case the customer’s payment fails in the first attempt. With this option, they can reattempt the payment for the second time. You can integrate one of the two options you prefer.

Create a Plisio payment option on Bigcommerce
- Log into your Bigcommerce Admin Dashboard.
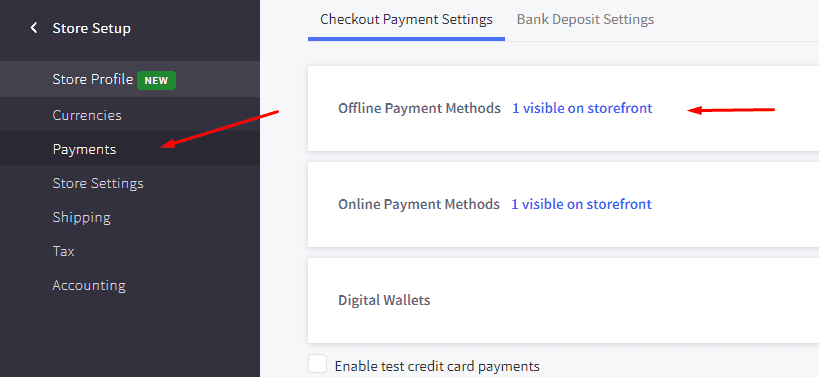
- Click on "Store Setup" located on the left.
- Select one from the available “Payments” options.
- Locate the “Offline Payment Methods” option located on the page top.
- Slide to the “Bank Deposit”.
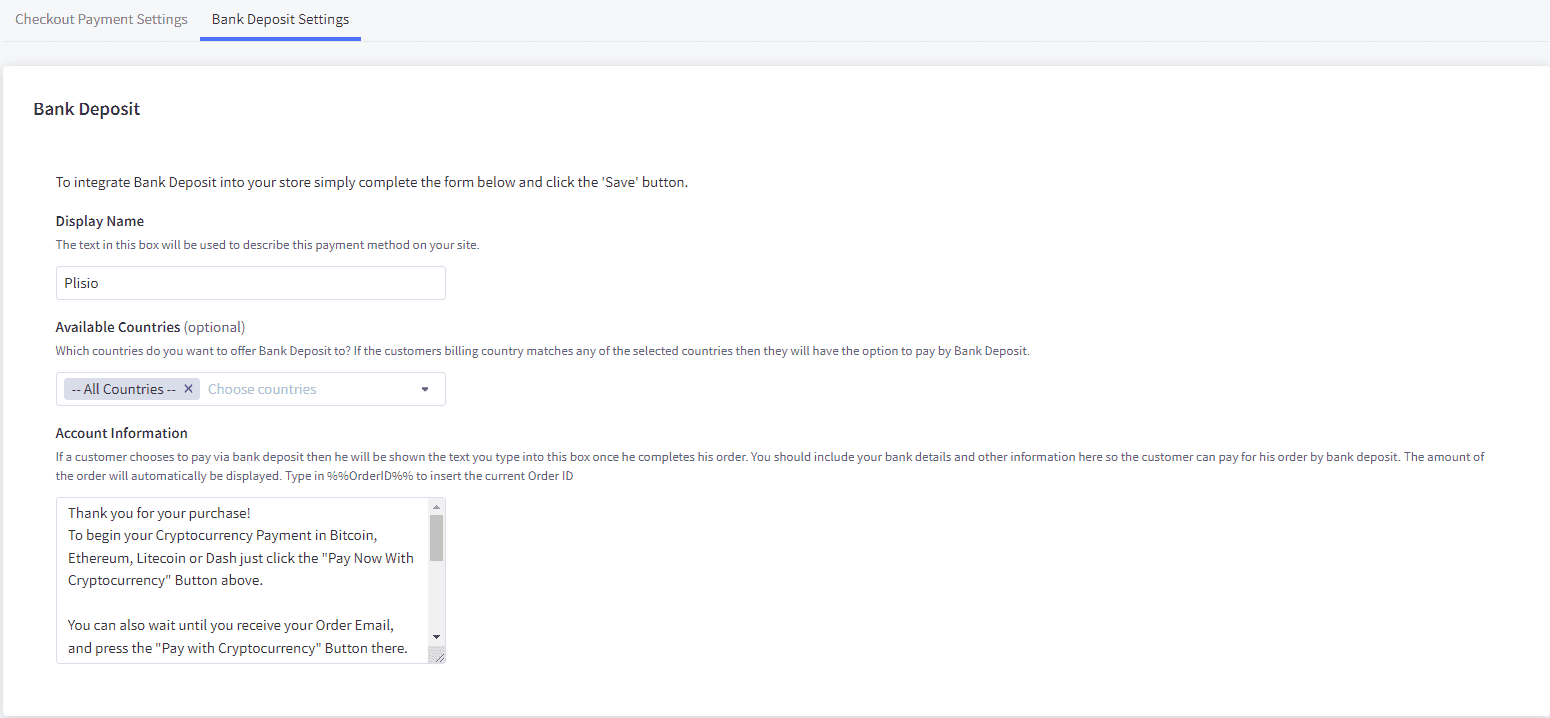
- Select the "Bank Deposit Settings" tab on the page top.
- Fill out the details as desired for your store.
Our example:
Display Name:
Plisio
Available Countries:
All Countries
Payment instructions:
Thank you for your purchase!
To begin your Cryptocurrency Payment in Bitcoin, Ethereum, Litecoin or Dash just click the "Pay With
Cryptocurrency now" button.
You can also wait until you receive your Order Email, and click on the "Pay with Cryptocurrency" Button there.
Or Alternatively, Login and navigate to your order history page: https://www.mystorename.com/account.php
Once there, click on the order you want to pay for, then press the "Pay Now With Cryptocurrency" Button.
You will be securely redirected to Plisio to finish your payment.
Please contact us if you have any questions or difficulties.


Option #1: Installing the Button to your Bigcommerce Checkout Page.
Log into your Bigcommerce Admin Dashboard.
Conversion Tracking Snippet:
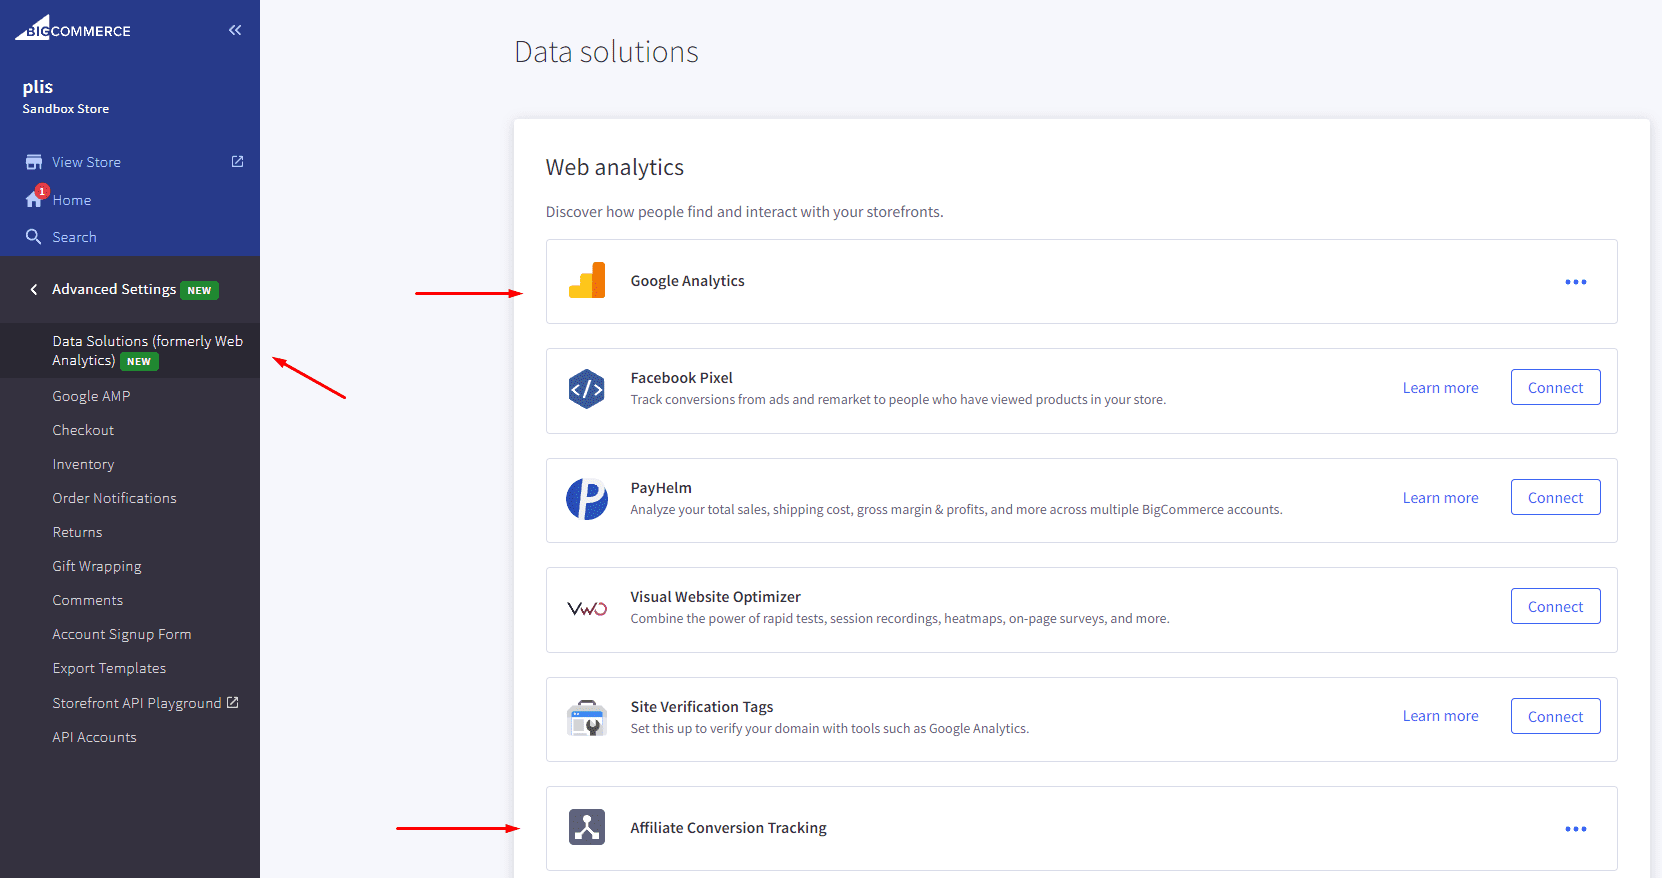
Click on the Advanced Settings tab on the left.
Choose the "Data Solutions" option from the left tab.
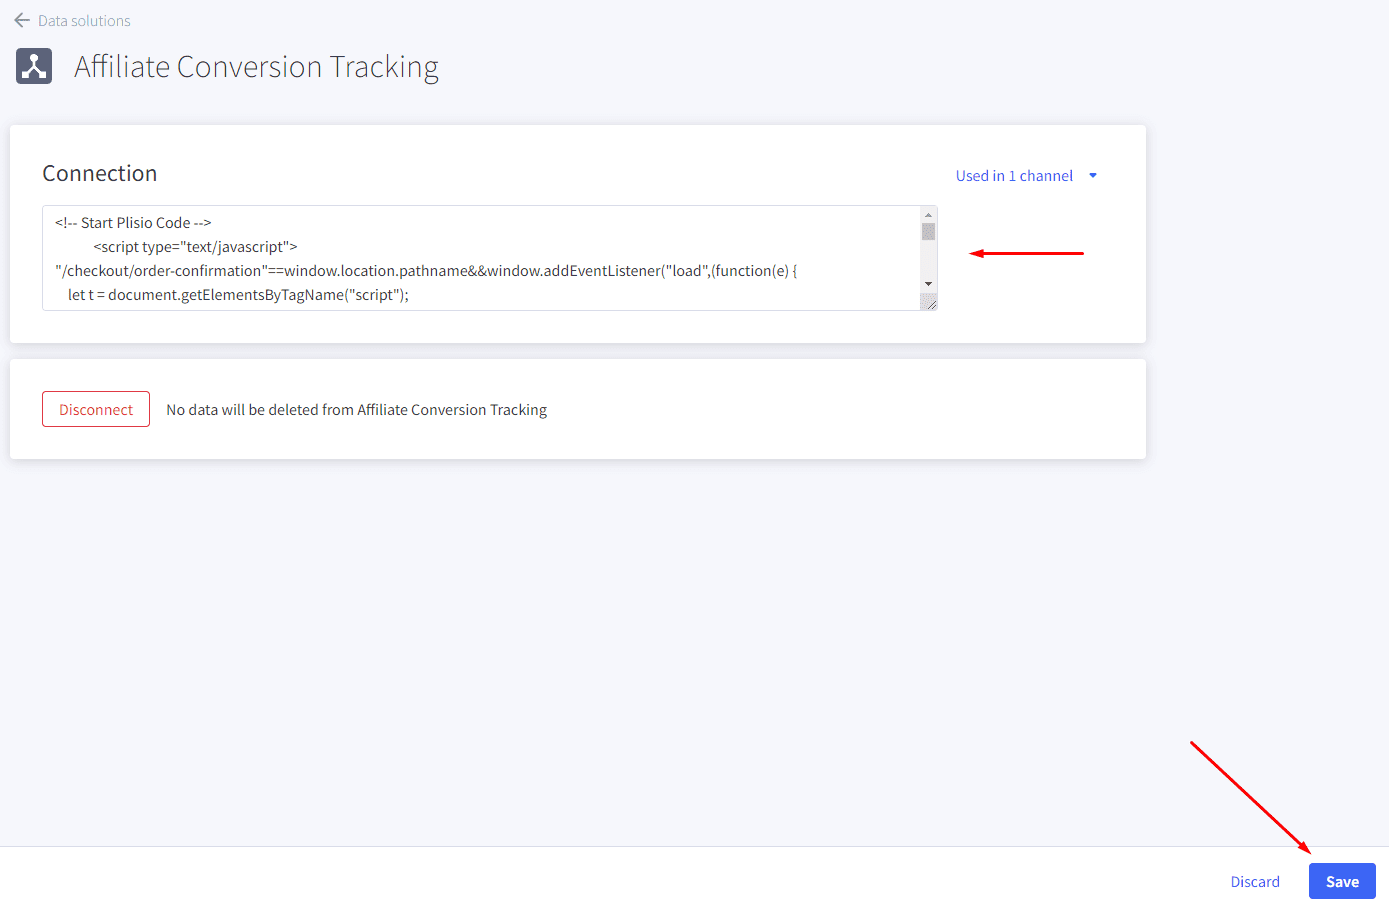
Now Enable "Affiliate Conversion Tracking" and paste the "Affiliate Conversion Tracking snippet" from our guide. (Do not remove/edit anything else in this text box unless you know what you're doing)
Click Save.
Now this time we'll enable the "Google Analytics" Tab.
This part is important: If the Google Analytics text box is completely empty we'll need to put in empty script tags. This is just used as a placeholder so that bigcommerce enables the Google Analytics Pixel we need to get some details from.
<script> </script>
If the "Google Analytics" text box already has something else in it, such as your Google Analytics Scripts, there's no need to put in the above empty script tags, as the other scripts in the text box already enables the Google Analytics Pixel we need. (Please Note: If the "Google Analytics" Pixel is not enabled, during checkout our payment button might fail to properly pass Tax and Shipping Chargers).
Order Page Payment Button:
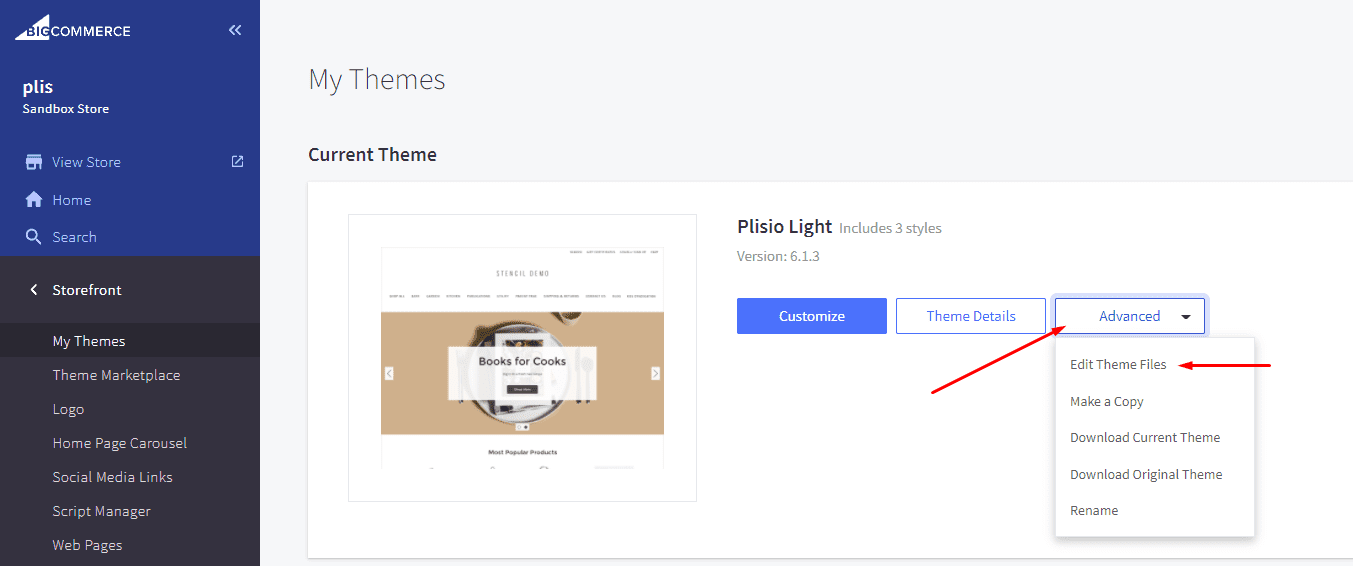
Click on the Storefront tab on the left.
Choose the "My Themes" option from the left tab.
Click on "Make a Copy" for your current theme.
Choose a new theme name, for example “Plisio”, press “Save a Copy”.
Apply the new theme.
Click on the “Advanced” tab of the new theme.
Select "Edit Theme Files" from the dropdown.
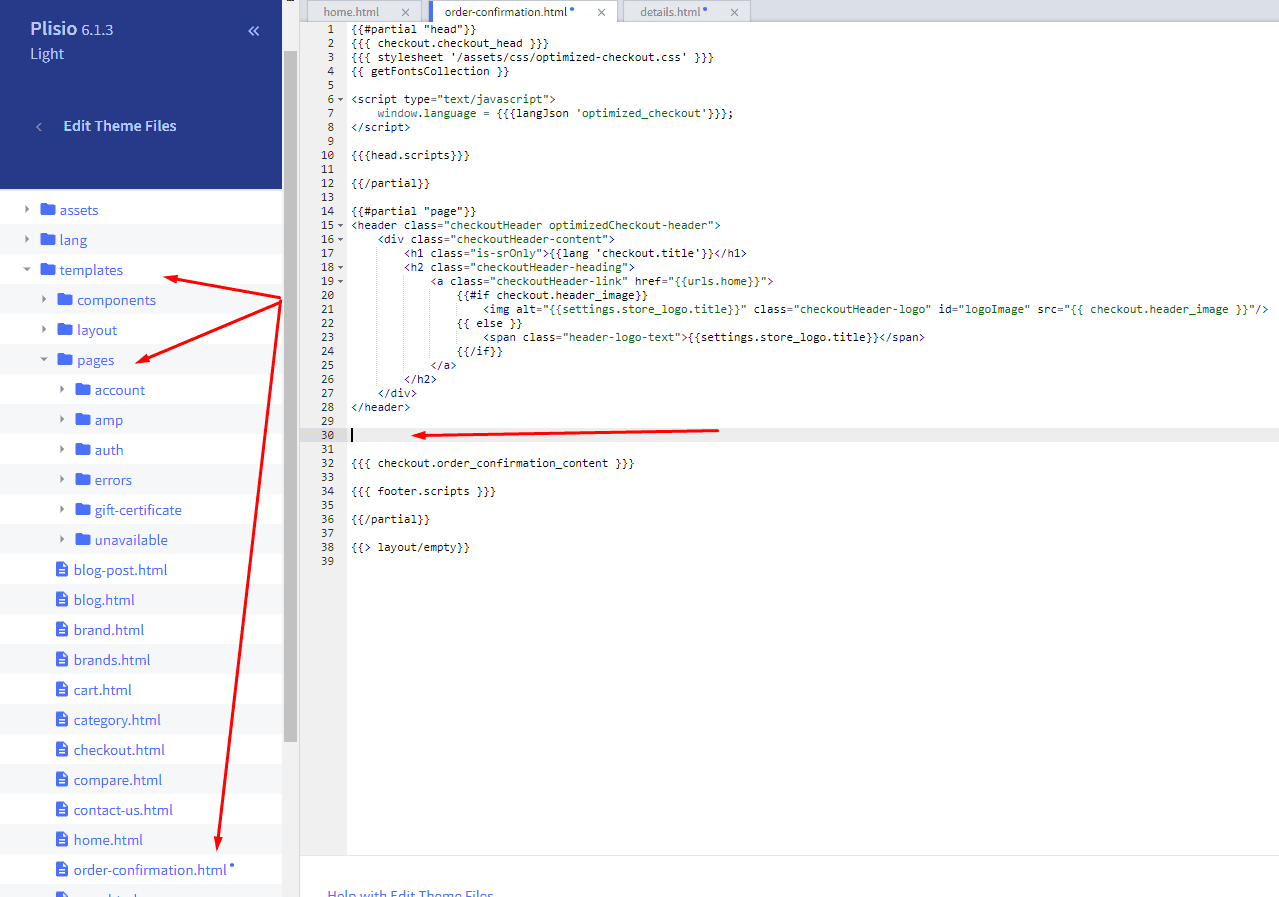
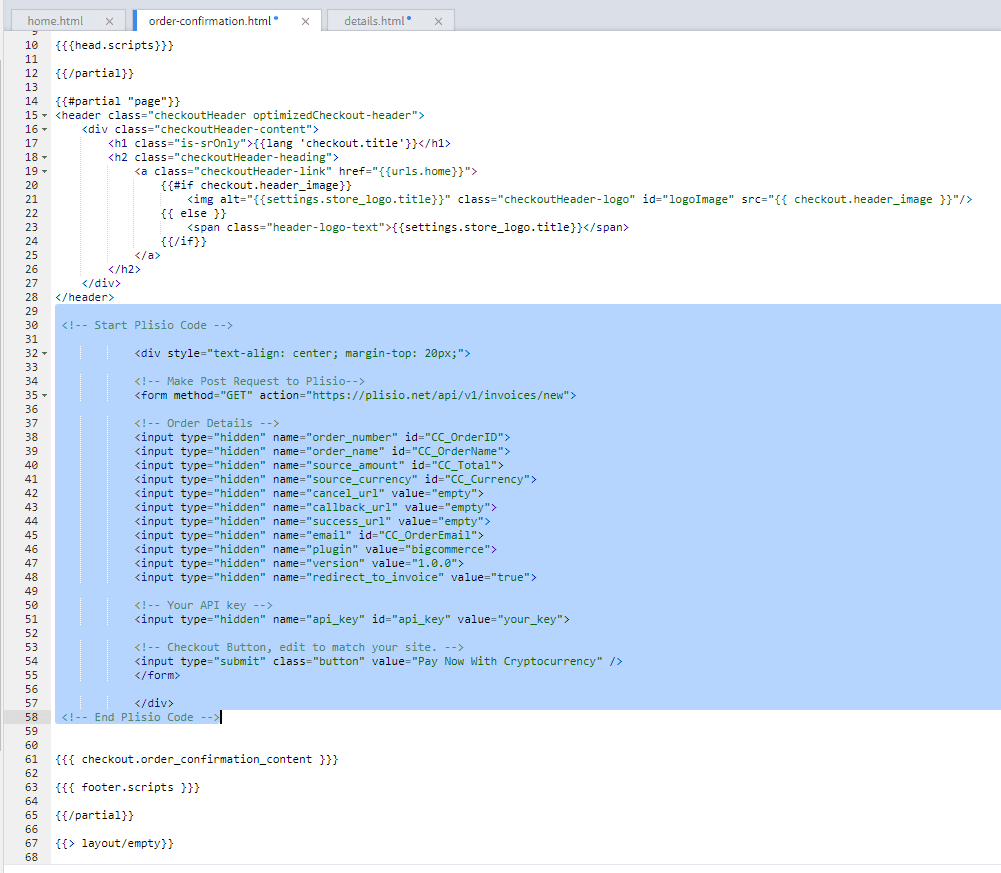
Navigate to the Templates/Pages Folder and open "order-confirmation.html".
Find the line directly above "{{{ checkout.order_confirmation_content }}}."
Paste the "Order Page Payment Button" Script from our guide (don’t forget to change the API key value!).
Press Save.

Option #2: Installing the Button into your Bigcommerce Order History Page.
Click on the Storefront tab on the left.
Choose the "My Themes" option from the left tab.
Click on "Make a Copy" for your current theme.
(If you already made a copy of theme like in option #2 then just skip this part to select “Edit Theme Files”)
Choose new theme name, for example “Plisio”, press “Save a Copy”.
Apply a new theme.
Click on the “Advanced” tab of the new theme.
Select "Edit Theme Files" from the dropdown.
Locate and open: templates/pages/account/orders/details.html
Scroll to the middle of the code.
Locate in the code: < button data-print-invoice="{{ order.invoice_url }}"
Paste the "Order History Page" Script from our guide (don’t forget to change the API key value!) between the < button data-print-invoice=and the < /section> field.
This will add the Plisio payment button to your store.
Press Save.

Testing, Finishing Up and Marking Payments as Received.
You have successfully integrated Plisio into Bigcommerce!
You should generate a test order for your store.Use the Plisio Payment option and go through the entire checkout process to make sure everything works as intended.
Make sure that all installed button options on the Checkout Page and Customer Order History Page work correctly.
Once a customer has submitted a payment for an order, check your wallet to make sure that you’ve received the correct cryptocurrency amount. If everything is in order, mark the payment as received in the Bigcommerce Dashboard so the order could be processed accordingly.
자주 묻는 질문
BigCommerce는 온라인 상점을 만들고 관리하기 위한 SaaS(software-as-a-service) 솔루션을 기업에 제공하는 전자 상거래 플랫폼입니다. BigCommerce를 통해 판매자는 다른 전자 상거래 관련 작업 중에서 사용자 정의 가능한 온라인 상점을 설계 및 시작하고, 재고를 관리하고, 지불을 처리하고, 주문을 이행할 수 있습니다. BigCommerce는 마케팅 도구, 인기 있는 결제 게이트웨이, 배송 제공업체 및 판매 채널과의 통합, 강력한 분석 및 보고 기능과 같은 기능을 제공하여 도달 범위를 확장하고 온라인 판매를 늘리려는 기업을 위한 올인원 솔루션입니다.
BigCommerce에 지불 게이트웨이를 추가하려면 다음 단계를 따르십시오.
- BigCommerce 상점 제어판에 로그인하십시오.
- "Store Setup" 섹션으로 이동한 다음 "Payment"를 클릭하십시오.
- "결제 게이트웨이" 섹션까지 아래로 스크롤하고 "결제 게이트웨이 추가" 버튼을 클릭합니다.
- 추가하려는 지불 게이트웨이를 선택하십시오(예: Plisio).
- 결제 게이트웨이에 필요한 정보(예: API 자격 증명, 판매자 계정 정보)를 입력합니다.
- 상점에 결제 게이트웨이 추가를 완료하려면 "저장" 버튼을 클릭하십시오.
참고: 결제 게이트웨이를 BigCommerce에 추가하는 구체적인 단계는 선택한 결제 게이트웨이에 따라 다를 수 있습니다. 통합을 올바르게 설정하려면 지불 게이트웨이 공급자가 제공하는 추가 단계를 따라야 할 수도 있습니다.
Bigcommerce 상점에서 Bitcoin을 결제 옵션으로 수락하려면 다음 단계를 따르십시오.
- 비트코인 결제 프로세서 선택: BitPay, Coinbase 및 Plisio와 같이 비트코인 결제를 수락할 수 있는 다양한 결제 프로세서가 있습니다. 비즈니스 요구 사항을 충족하고 Bigcommerce와 통합되는 프로세서를 선택하십시오.
- 결제 프로세서를 Bigcommerce 상점과 통합: 결제 프로세서에서 제공하는 지침에 따라 Bigcommerce 상점과 통합하십시오. 여기에는 일반적으로 Bigcommerce 상점의 설정에 일부 코드를 복사하여 붙여넣는 작업이 포함됩니다.
- 비트코인을 결제 옵션으로 활성화: Bigcommerce 상점 설정에서 비트코인을 결제 옵션으로 활성화합니다. 이를 통해 고객은 결제 시 선호하는 결제 수단으로 비트코인을 선택할 수 있습니다.
- 비트코인 결제 모니터링: 결제 프로세서는 비트코인 결제를 모니터링하고 관리할 수 있는 대시보드를 제공합니다. 대시보드를 주시하고 정기적으로 지불을 조정하십시오.
다음 단계를 따르면 Bigcommerce 상점에서 비트코인 결제 수락을 시작할 수 있습니다.
예, Plisio는 BigCommerce를 위한 결제 게이트웨이 통합을 제공합니다. Plisio 지불 게이트웨이를 통해 BigCommerce 판매자는 Bitcoin, Ethereum, Bitcoin Cash, Litecoin 등을 포함하여 고객의 지불로 여러 암호 화폐를 수락할 수 있습니다. BigCommerce 스토어에서 결제 게이트웨이로 Plisio를 통합하려면 Plisio에서 제공하는 지침을 따르거나 지원 팀에 문의하여 도움을 받을 수 있습니다.
BigCommerce는 중소기업에서 대기업에 이르기까지 다양한 회사에서 사용하는 전자 상거래 플랫폼입니다. BigCommerce를 사용하는 주목할만한 회사는 다음과 같습니다.
- Skullcandy
- Toyota
- Ben & Jerry
- Molton Brown
- Kodak
- Sony
- Vodafone
- HP
- YETI
- Paul Mitchell
전자 상거래 요구에 BigCommerce를 사용하는 다른 많은 유명 브랜드 및 회사가 있기 때문에 이는 몇 가지 예일 뿐입니다.
BigCommerce는 고객에게 소프트웨어 사용에 대한 월 구독료를 청구하고 판매 수익의 일정 비율을 취함으로써 돈을 버는 전자 상거래 플랫폼입니다. BigCommerce는 다양한 규모와 요구의 비즈니스를 수용할 수 있는 다양한 가격 책정 계획을 제공하며 구독 계획 계층이 증가함에 따라 수익 공유 비율이 감소합니다. 구독료 및 수익 공유 외에도 BigCommerce는 전문 디자인 서비스, 마케팅 및 SEO 도구, 다른 소프트웨어 응용 프로그램과의 통합과 같은 추가 유료 서비스 및 추가 기능을 제공합니다.
BigCommerce 플러그인 다운로드
그리고 지금 암호 화폐 수락을 시작하십시오
클릭 2번으로 무료 가입 • 2분만에 간편한 설정 • 연중무휴 기술 지원