10+整合指南
直接付款
我们将付款直接转入您的钱包(我们不持有客户的钱)。
没有KYC
您无需完成 KYC 即可开始使用我们的插件。过程中没有第三方账户,只用自己的钱包。
无限
您可以创建无限数量的请求。
接受全世界的加密货币
我们的用户没有国家/地区限制。该插件在全球范围内可用。


每个人 可以接受加密货币支付
很简单
最低费用
加密货币和法定货币
如何开始
In this article we will walk you through integrating Plisio into your Bigcommerce Store, as well as summarize some of the benefits of accepting cryptocurrencies. We’ve also prepared a guide for you on how to integrate a cryptocurrency payment into your website.
Now that we've discussed the benefits of accepting Cryptocurrency and choosing Plisio, let's take a look at how to integrate Plisio into Bigcommerce.
What we expect from the integration:
There are several ways of integrating Plisio into the Bigcommerce platform. While we’re on it, we want to make sure that all of our integrations meet a few requirements, and also warn you about some pitfalls.
- We would like to keep all of our orders inside of Bigcommerce’s platform. This includes using Bigcommerce’s checkout option to securely generate the order, collect the buyer’s info, calculate shipping costs and taxes, offer discounts or coupon codes, etc.
- We would also want your customers to be able to review their order history that will be kept in our Bigcommerce store.
- We want to keep the “Pending Payment'' status of your order until we can manually verify that we have received the crypto payment. This will allow us to make sure that all Blockchain confirmations are received before changing the order status to “payment received”.
- We want to be able to use our standard Shipping and Bookkeeping integrations for Bigcommerce, without requiring any additional plugins or software to add Plisio to our store.
The pitfalls:
- One of the Bigcommerce’s cons is that they do not offer any cryptocurrency payment options for merchants. This can be resolved with a custom code that will allow you to integrate your own Payment Gateway into the Checkout process.
- Unfortunately, Bigcommerce's new Stencil Theme does not allow merchants to directly customize or add code/scripts to the checkout process. They have mentioned adding the customization option in the future, but for now it is on hold. So we’ve got to get creative to get around this.
- We’ll need to be able to securely send the order information such as the order ID and the Order Total (Price) to the Plisio Platform while making sure there are no wrong order details sent.
Our Two Integration Options for Bigcommerce
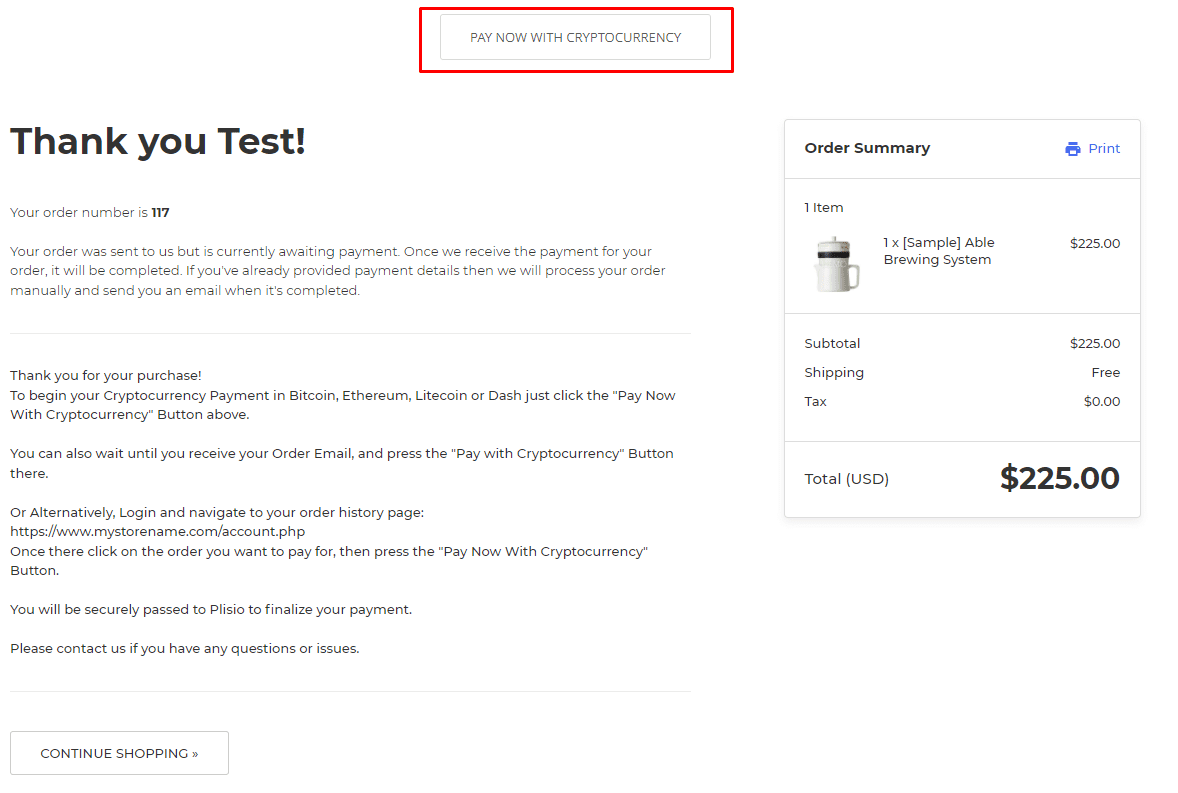
Option #1: Install a "Pay With Cryptocurrency" Button to the Order Confirmation Page, allowing the customer to make payment while checking out.
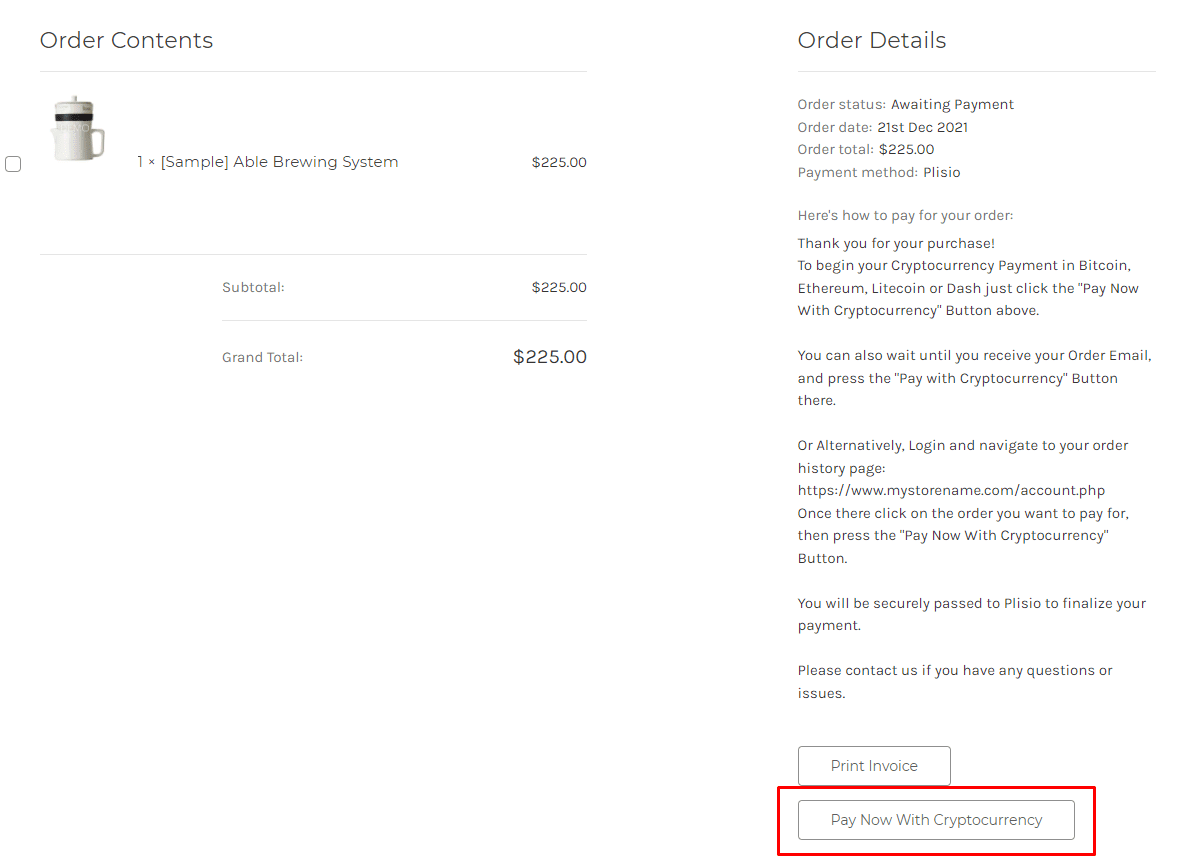
Option #2: Or install a "Pay With Cryptocurrency" Button to the Customer Dashboard, so that they can pay from their order history page.
In this guide, we will show you how to integrate these two options: Although you will only need the option #1, the other option suggests a back-up in case the customer’s payment fails in the first attempt. With this option, they can reattempt the payment for the second time. You can integrate one of the two options you prefer.

Create a Plisio payment option on Bigcommerce
- Log into your Bigcommerce Admin Dashboard.
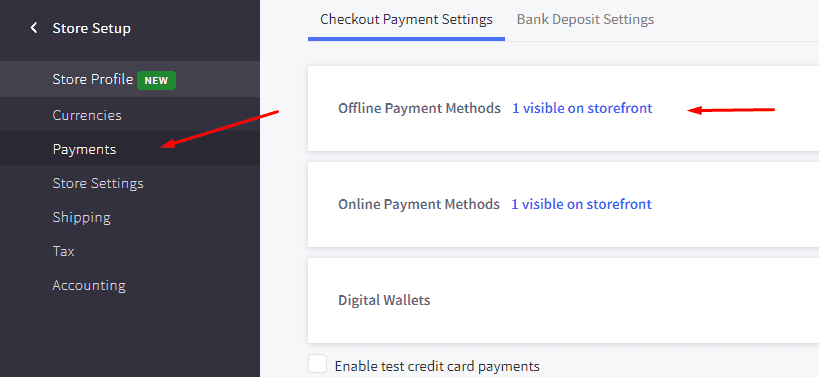
- Click on "Store Setup" located on the left.
- Select one from the available “Payments” options.
- Locate the “Offline Payment Methods” option located on the page top.
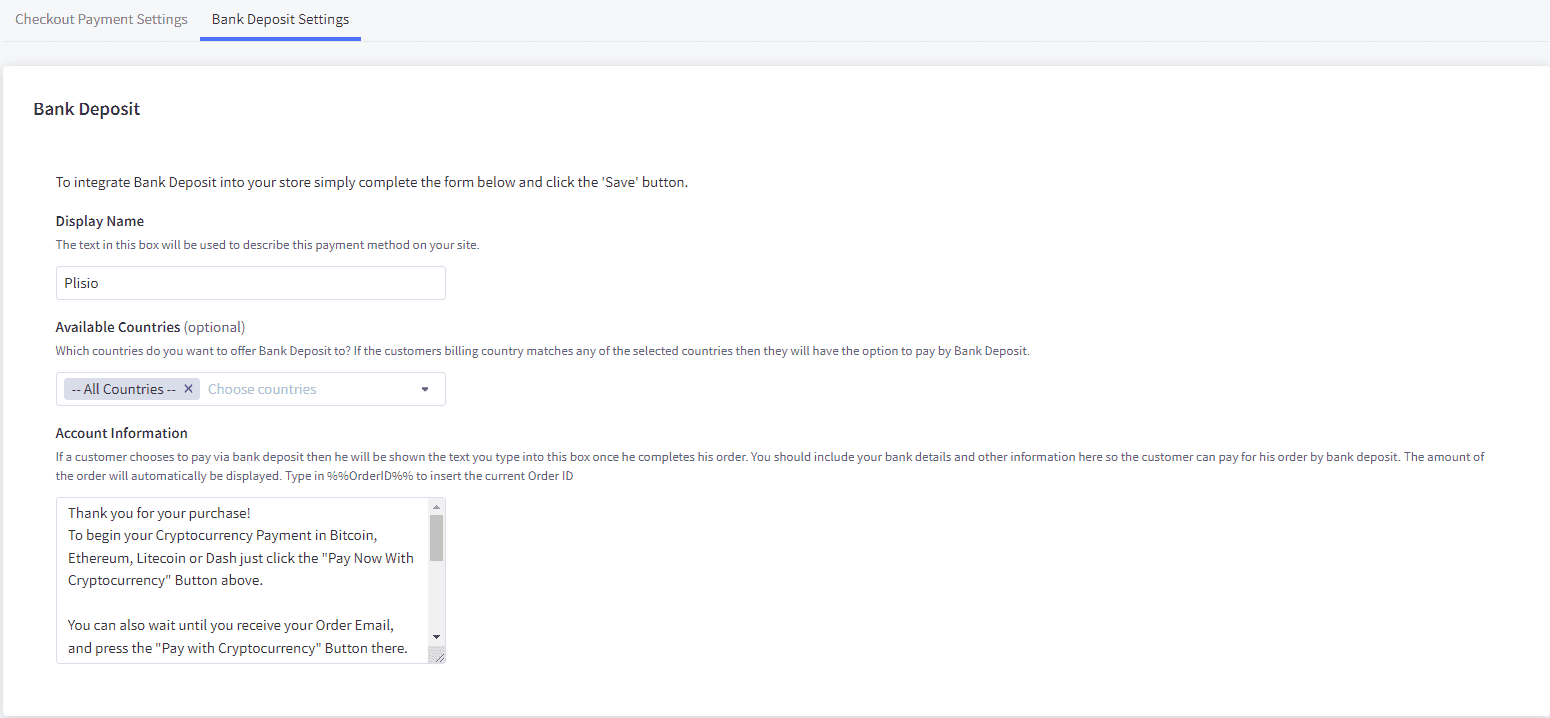
- Slide to the “Bank Deposit”.
- Select the "Bank Deposit Settings" tab on the page top.
- Fill out the details as desired for your store.
Our example:
Display Name:
Plisio
Available Countries:
All Countries
Payment instructions:
Thank you for your purchase!
To begin your Cryptocurrency Payment in Bitcoin, Ethereum, Litecoin or Dash just click the "Pay With
Cryptocurrency now" button.
You can also wait until you receive your Order Email, and click on the "Pay with Cryptocurrency" Button there.
Or Alternatively, Login and navigate to your order history page: https://www.mystorename.com/account.php
Once there, click on the order you want to pay for, then press the "Pay Now With Cryptocurrency" Button.
You will be securely redirected to Plisio to finish your payment.
Please contact us if you have any questions or difficulties.


Option #1: Installing the Button to your Bigcommerce Checkout Page.
Log into your Bigcommerce Admin Dashboard.
Conversion Tracking Snippet:
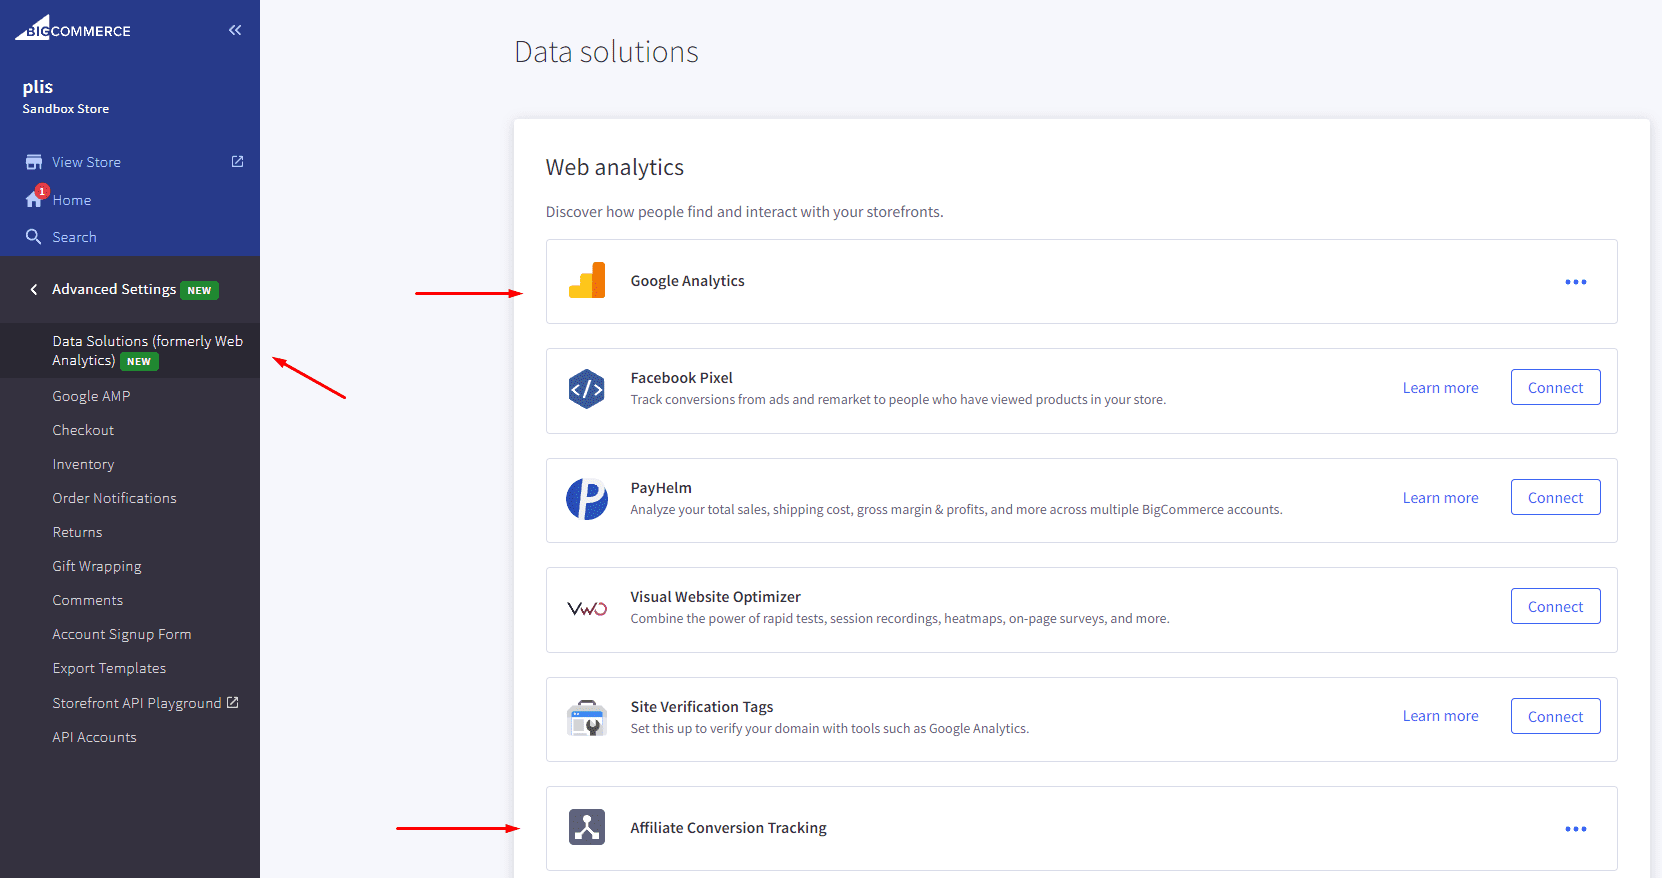
Click on the Advanced Settings tab on the left.
Choose the "Data Solutions" option from the left tab.
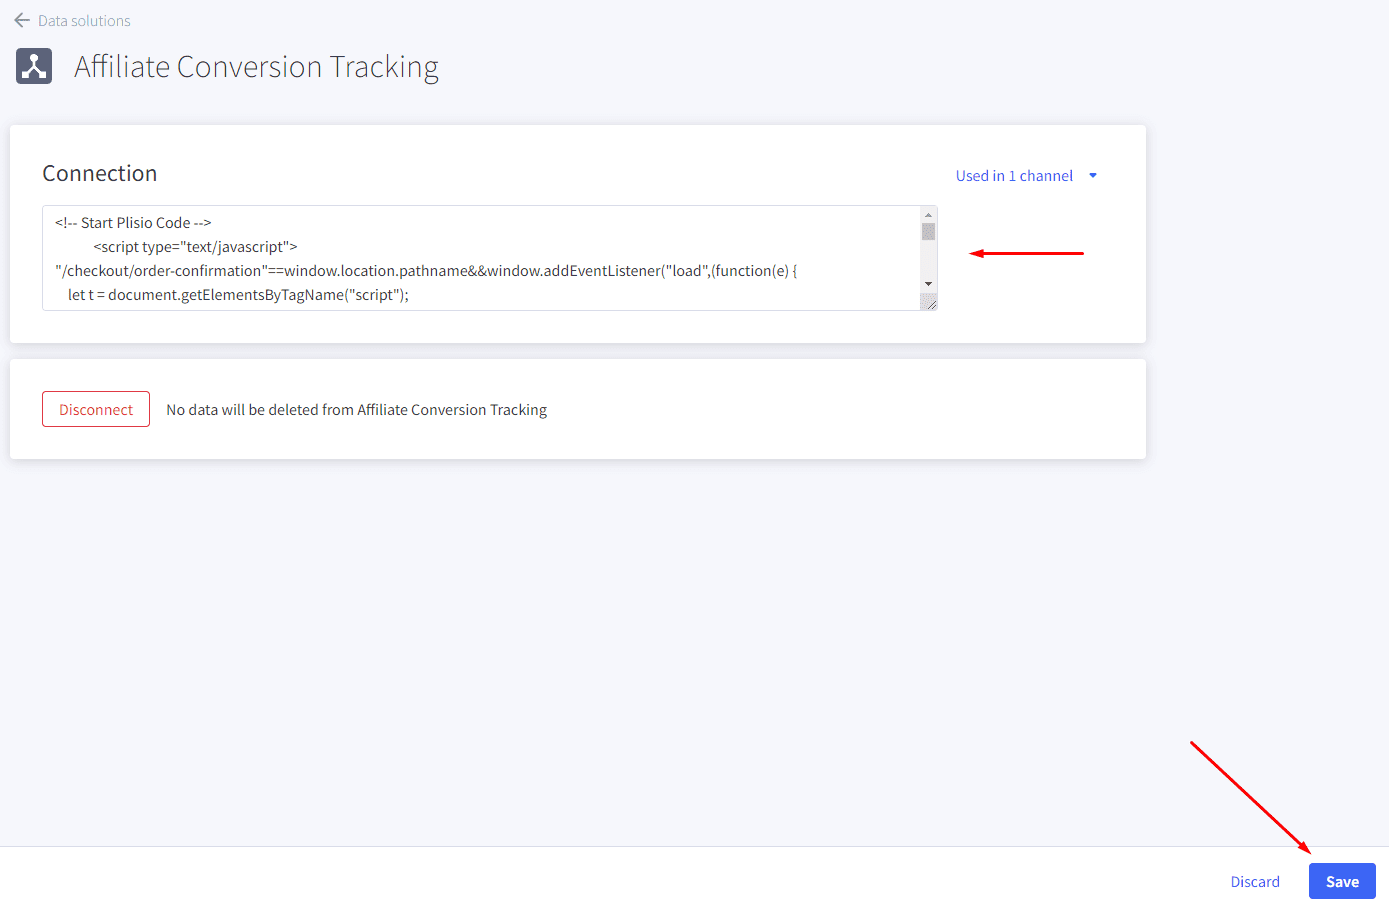
Now Enable "Affiliate Conversion Tracking" and paste the "Affiliate Conversion Tracking snippet" from our guide. (Do not remove/edit anything else in this text box unless you know what you're doing)
Click Save.
Now this time we'll enable the "Google Analytics" Tab.
This part is important: If the Google Analytics text box is completely empty we'll need to put in empty script tags. This is just used as a placeholder so that bigcommerce enables the Google Analytics Pixel we need to get some details from.
<script> </script>
If the "Google Analytics" text box already has something else in it, such as your Google Analytics Scripts, there's no need to put in the above empty script tags, as the other scripts in the text box already enables the Google Analytics Pixel we need. (Please Note: If the "Google Analytics" Pixel is not enabled, during checkout our payment button might fail to properly pass Tax and Shipping Chargers).
Order Page Payment Button:
Click on the Storefront tab on the left.
Choose the "My Themes" option from the left tab.
Click on "Make a Copy" for your current theme.
Choose a new theme name, for example “Plisio”, press “Save a Copy”.
Apply the new theme.
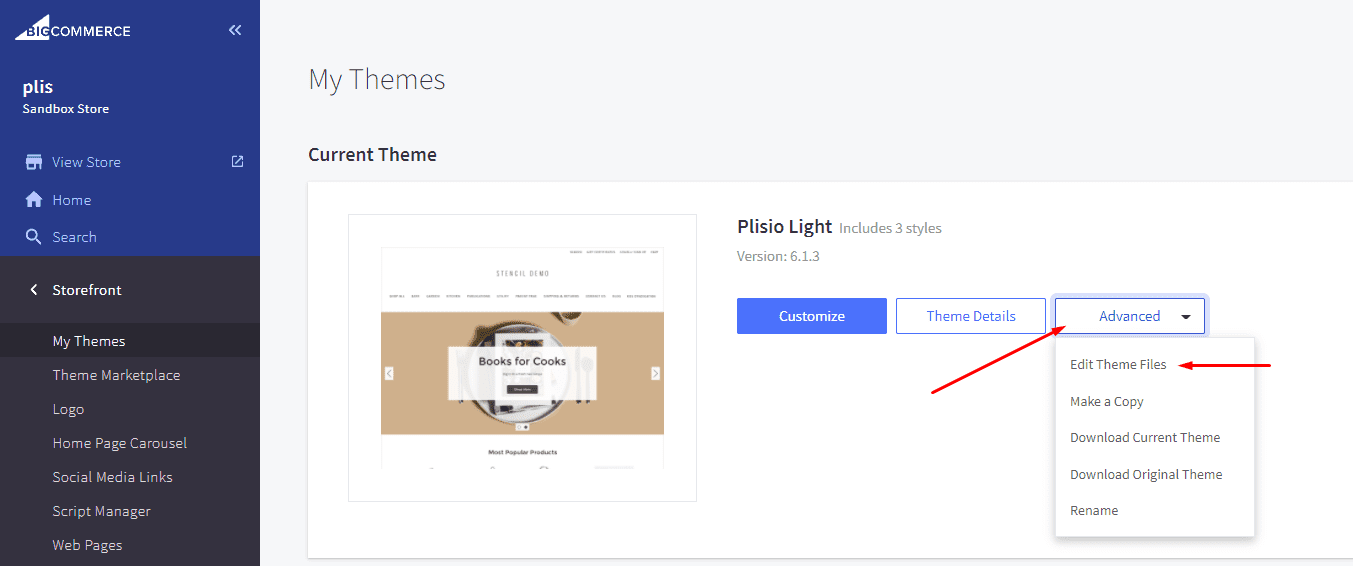
Click on the “Advanced” tab of the new theme.
Select "Edit Theme Files" from the dropdown.
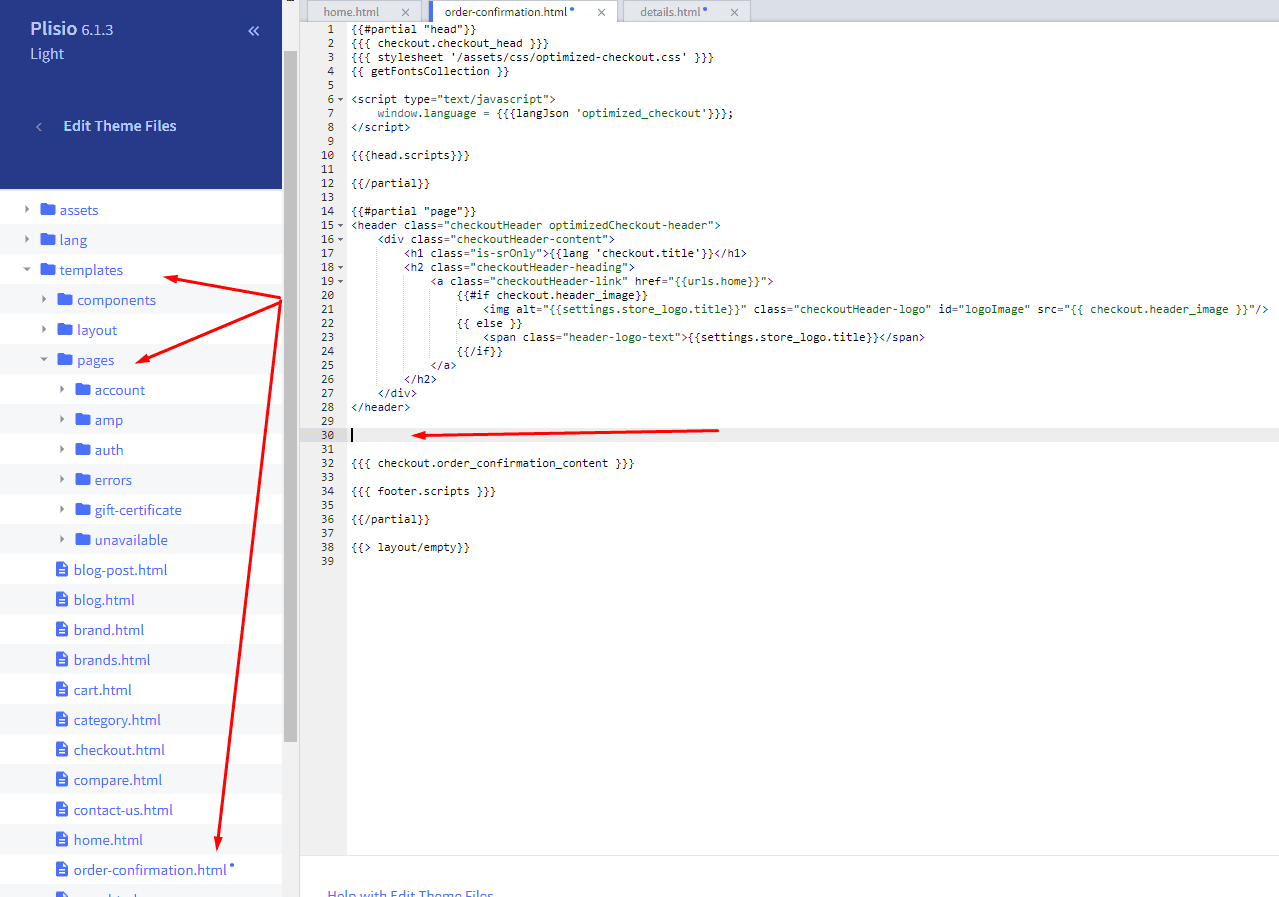
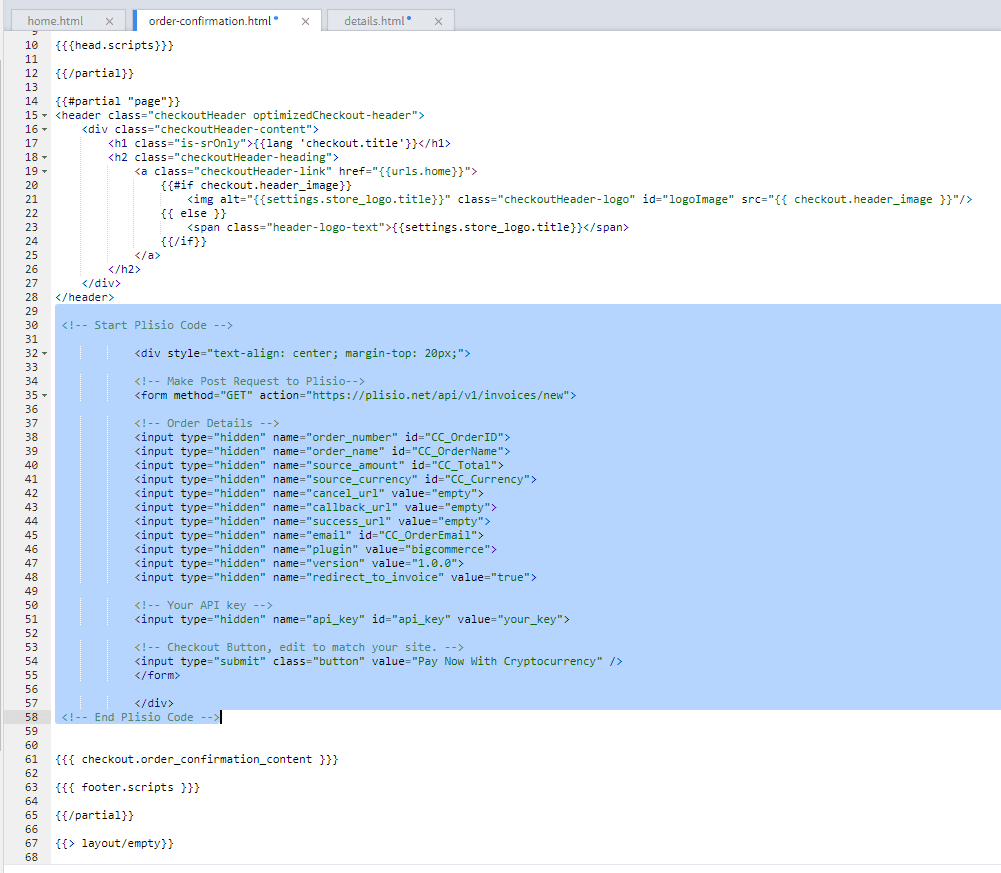
Navigate to the Templates/Pages Folder and open "order-confirmation.html".
Find the line directly above "{{{ checkout.order_confirmation_content }}}."
Paste the "Order Page Payment Button" Script from our guide (don’t forget to change the API key value!).
Press Save.

Option #2: Installing the Button into your Bigcommerce Order History Page.
Click on the Storefront tab on the left.
Choose the "My Themes" option from the left tab.
Click on "Make a Copy" for your current theme.
(If you already made a copy of theme like in option #2 then just skip this part to select “Edit Theme Files”)
Choose new theme name, for example “Plisio”, press “Save a Copy”.
Apply a new theme.
Click on the “Advanced” tab of the new theme.
Select "Edit Theme Files" from the dropdown.
Locate and open: templates/pages/account/orders/details.html
Scroll to the middle of the code.
Locate in the code: < button data-print-invoice="{{ order.invoice_url }}"
Paste the "Order History Page" Script from our guide (don’t forget to change the API key value!) between the < button data-print-invoice=and the < /section> field.
This will add the Plisio payment button to your store.
Press Save.

Testing, Finishing Up and Marking Payments as Received.
You have successfully integrated Plisio into Bigcommerce!
You should generate a test order for your store.Use the Plisio Payment option and go through the entire checkout process to make sure everything works as intended.
Make sure that all installed button options on the Checkout Page and Customer Order History Page work correctly.
Once a customer has submitted a payment for an order, check your wallet to make sure that you’ve received the correct cryptocurrency amount. If everything is in order, mark the payment as received in the Bigcommerce Dashboard so the order could be processed accordingly.
经常问的问题
BigCommerce 是一个电子商务平台,可为企业提供用于创建和管理在线商店的软件即服务解决方案。借助 BigCommerce,商家可以设计和启动可定制的在线商店、管理库存、处理付款和履行订单,以及其他与电子商务相关的任务。 BigCommerce 提供营销工具、与流行的支付网关、运输提供商和销售渠道的集成以及强大的分析和报告功能等功能,使其成为希望扩大影响范围和增加在线销售额的企业的一体化解决方案。
要向 BigCommerce 添加支付网关,请按照下列步骤操作:
- 登录到您的 BigCommerce 商店控制面板。
- 转到“商店设置”部分,然后单击“付款”。
- 向下滚动到“支付网关”部分,然后单击“添加支付网关”按钮。
- 选择您要添加的支付网关(例如 Plisio)。
- 输入支付网关所需的信息(例如 API 凭据、商家帐户信息)。
- 单击“保存”按钮完成将支付网关添加到您的商店。
注意:将支付网关添加到 BigCommerce 的具体步骤可能因您选择的支付网关而异。您可能需要按照支付网关提供商提供的其他步骤正确设置集成。
要在您的 Bigcommerce 商店中接受比特币作为支付选项,您可以按照以下步骤操作:
- 选择比特币支付处理器:有多种可用的支付处理器,例如 BitPay、Coinbase 和 Plisio,它们允许您接受比特币支付。选择满足您的业务需求并与 Bigcommerce 集成的处理器。
- 将支付处理器与您的 Bigcommerce 商店集成:按照支付处理器提供的说明将其与您的 Bigcommerce 商店集成。这通常涉及将一些代码复制并粘贴到您的 Bigcommerce 商店的设置中。
- 启用比特币作为支付选项:在您的 Bigcommerce 商店的设置中,启用比特币作为支付选项。这允许客户在结账时选择比特币作为他们首选的支付方式。
- 监控您的比特币支付:您的支付处理器将为您提供一个仪表板,您可以在其中监控和管理您的比特币支付。确保密切关注您的仪表板并定期核对您的付款。
按照这些步骤,您可以开始在您的 Bigcommerce 商店中接受比特币付款。
是的,Plisio 为 BigCommerce 提供支付网关集成。借助 Plisio 支付网关,BigCommerce 商家可以接受多种加密货币作为其客户的付款方式,包括比特币、以太币、比特币现金、莱特币等。要将 Plisio 集成为您的 BigCommerce 商店的支付网关,您可以按照 Plisio 提供的说明进行操作或联系他们的支持团队寻求帮助。
BigCommerce 是一个电子商务平台,被各种公司使用,从中小型企业到大型企业。一些使用 BigCommerce 的著名公司包括:
- Skullcandy
- Toyota
- Ben & Jerry
- Molton Brown
- Kodak
- Sony
- Vodafone
- HP
- YETI
- Paul Mitchell
这些只是几个例子,因为还有许多其他知名品牌和公司使用 BigCommerce 来满足他们的电子商务需求。
BigCommerce 是一个电子商务平台,通过向客户收取使用其软件的每月订阅费以及从他们的销售收入中抽取一定比例来赚钱。 BigCommerce 提供一系列定价计划以适应不同规模和需求的企业,其收入份额百分比随着订阅计划层级的增加而降低。除了订阅费和收入分成外,BigCommerce 还提供额外的付费服务和附加服务,例如专业设计服务、营销和 SEO 工具,以及与其他软件应用程序的集成。
下载 BigCommerce 插件
现在开始接受加密货币
点击 2 次即可免费注册 • 2 分钟内轻松设置 • 技术支持 24/7