BigCommerce-Kryptowährungs-Zahlungs-Plugin
Akzeptieren Sie Kryptowährung in Ihrem BigCommerce-Shop
10+ Integrationsleitfäden
Direktzahlungen
Wir überweisen Zahlungen direkt in Ihre Brieftasche (wir halten kein Kundengeld).
Kein KYC
Sie müssen kein KYC abschließen, um unser Plugin zu verwenden. Keine Konten von Drittanbietern während des Vorgangs, verwenden Sie einfach Ihre eigene Brieftasche.
Keine Grenzen
Sie können eine unbegrenzte Anzahl von Anfragen erstellen.
Akzeptieren Sie Kryptowährungen auf der ganzen Welt
Es gibt keine Länderbeschränkungen für unsere Benutzer. Dieses Plugin ist weltweit verfügbar.


Jeder kann Kryptowährungszahlungen akzeptieren
Es ist einfach
Minimale Gebühr
Krypto- und Fiat-Geld
Wie man anfängt
In this article we will walk you through integrating Plisio into your Bigcommerce Store, as well as summarize some of the benefits of accepting cryptocurrencies. We’ve also prepared a guide for you on how to integrate a cryptocurrency payment into your website.
Now that we've discussed the benefits of accepting Cryptocurrency and choosing Plisio, let's take a look at how to integrate Plisio into Bigcommerce.
What we expect from the integration:
There are several ways of integrating Plisio into the Bigcommerce platform. While we’re on it, we want to make sure that all of our integrations meet a few requirements, and also warn you about some pitfalls.
- We would like to keep all of our orders inside of Bigcommerce’s platform. This includes using Bigcommerce’s checkout option to securely generate the order, collect the buyer’s info, calculate shipping costs and taxes, offer discounts or coupon codes, etc.
- We would also want your customers to be able to review their order history that will be kept in our Bigcommerce store.
- We want to keep the “Pending Payment'' status of your order until we can manually verify that we have received the crypto payment. This will allow us to make sure that all Blockchain confirmations are received before changing the order status to “payment received”.
- We want to be able to use our standard Shipping and Bookkeeping integrations for Bigcommerce, without requiring any additional plugins or software to add Plisio to our store.
The pitfalls:
- One of the Bigcommerce’s cons is that they do not offer any cryptocurrency payment options for merchants. This can be resolved with a custom code that will allow you to integrate your own Payment Gateway into the Checkout process.
- Unfortunately, Bigcommerce's new Stencil Theme does not allow merchants to directly customize or add code/scripts to the checkout process. They have mentioned adding the customization option in the future, but for now it is on hold. So we’ve got to get creative to get around this.
- We’ll need to be able to securely send the order information such as the order ID and the Order Total (Price) to the Plisio Platform while making sure there are no wrong order details sent.
Our Two Integration Options for Bigcommerce
Option #1: Install a "Pay With Cryptocurrency" Button to the Order Confirmation Page, allowing the customer to make payment while checking out.
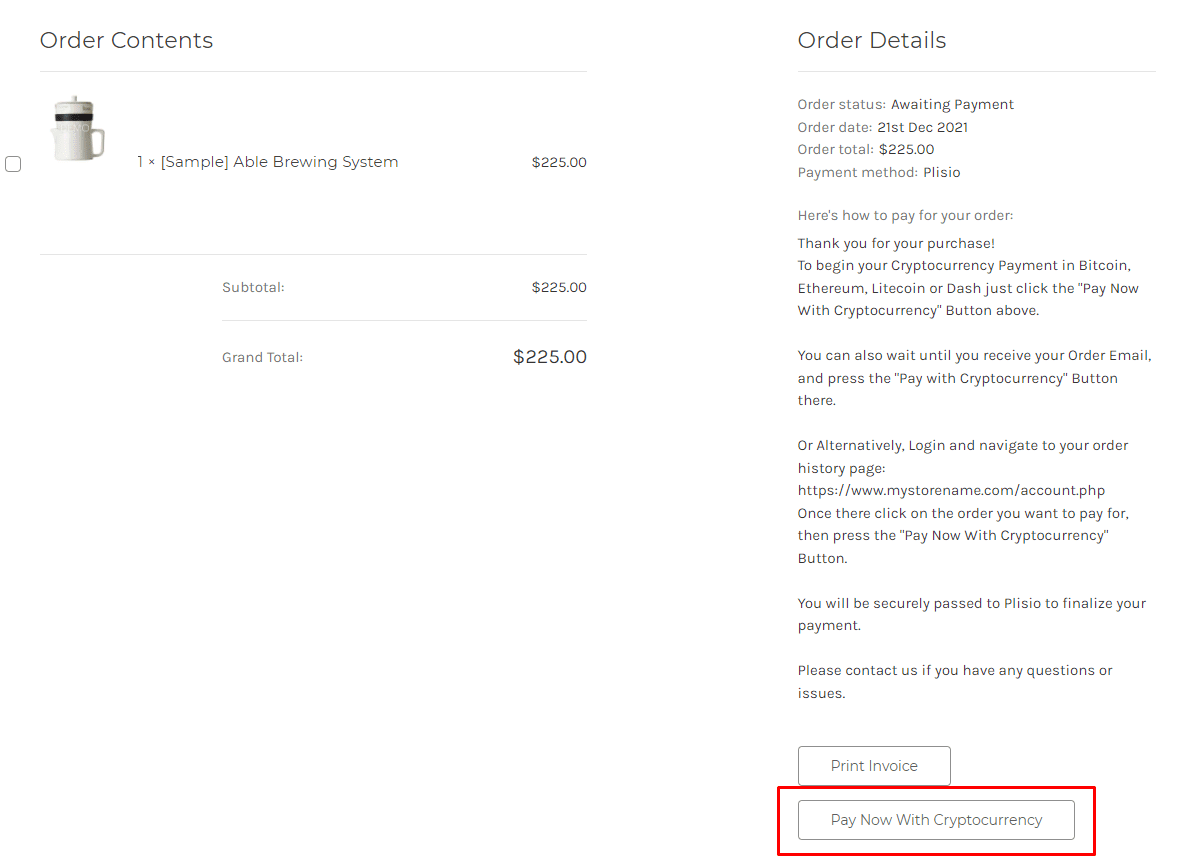
Option #2: Or install a "Pay With Cryptocurrency" Button to the Customer Dashboard, so that they can pay from their order history page.
In this guide, we will show you how to integrate these two options: Although you will only need the option #1, the other option suggests a back-up in case the customer’s payment fails in the first attempt. With this option, they can reattempt the payment for the second time. You can integrate one of the two options you prefer.

Create a Plisio payment option on Bigcommerce
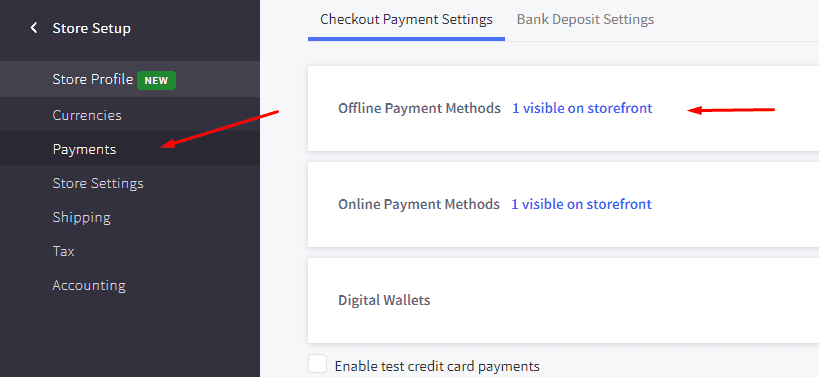
- Log into your Bigcommerce Admin Dashboard.
- Click on "Store Setup" located on the left.
- Select one from the available “Payments” options.
- Locate the “Offline Payment Methods” option located on the page top.
- Slide to the “Bank Deposit”.
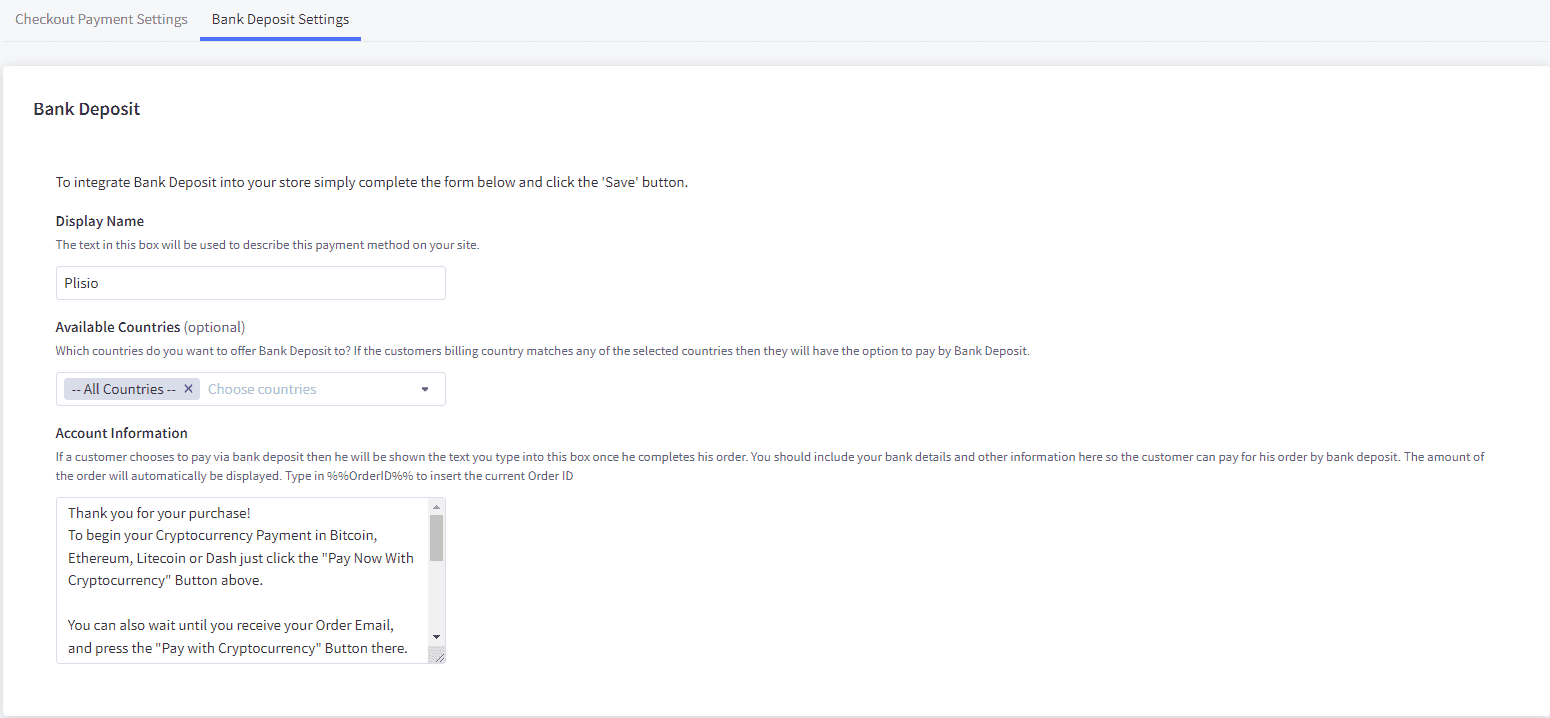
- Select the "Bank Deposit Settings" tab on the page top.
- Fill out the details as desired for your store.
Our example:
Display Name:
Plisio
Available Countries:
All Countries
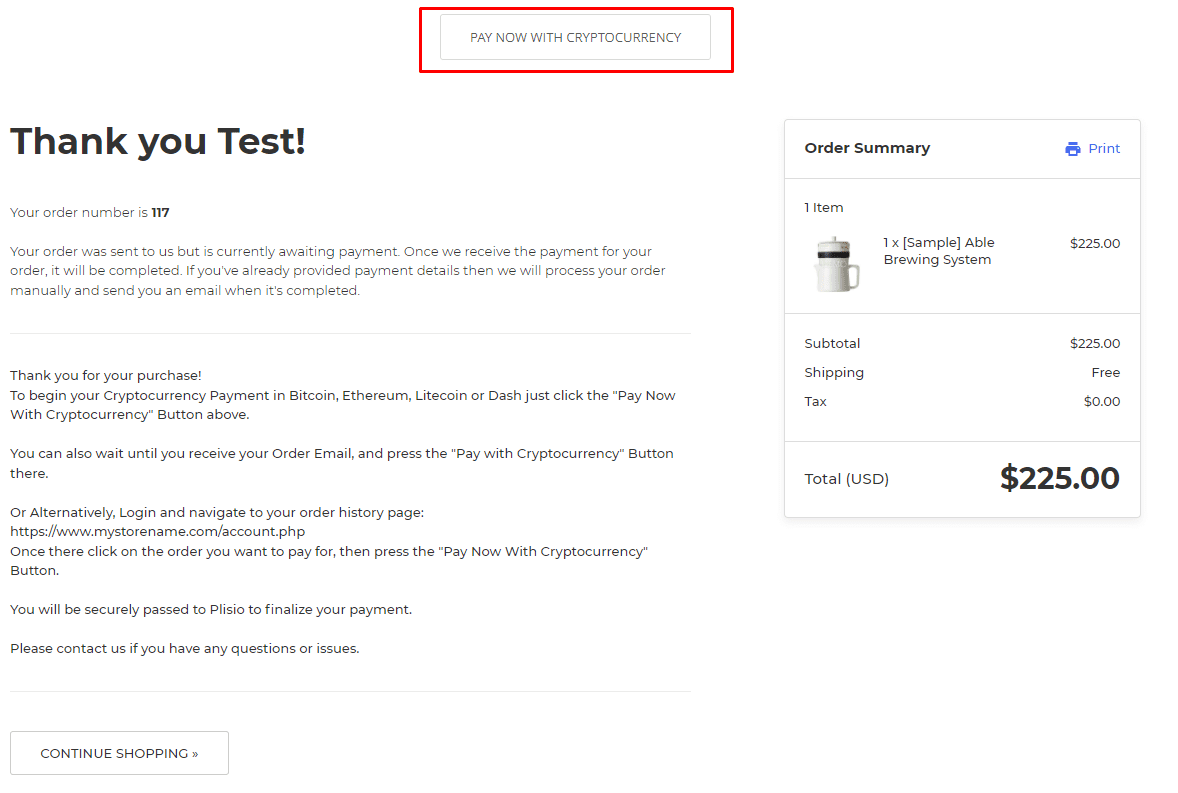
Payment instructions:
Thank you for your purchase!
To begin your Cryptocurrency Payment in Bitcoin, Ethereum, Litecoin or Dash just click the "Pay With
Cryptocurrency now" button.
You can also wait until you receive your Order Email, and click on the "Pay with Cryptocurrency" Button there.
Or Alternatively, Login and navigate to your order history page: https://www.mystorename.com/account.php
Once there, click on the order you want to pay for, then press the "Pay Now With Cryptocurrency" Button.
You will be securely redirected to Plisio to finish your payment.
Please contact us if you have any questions or difficulties.


Option #1: Installing the Button to your Bigcommerce Checkout Page.
Log into your Bigcommerce Admin Dashboard.
Conversion Tracking Snippet:
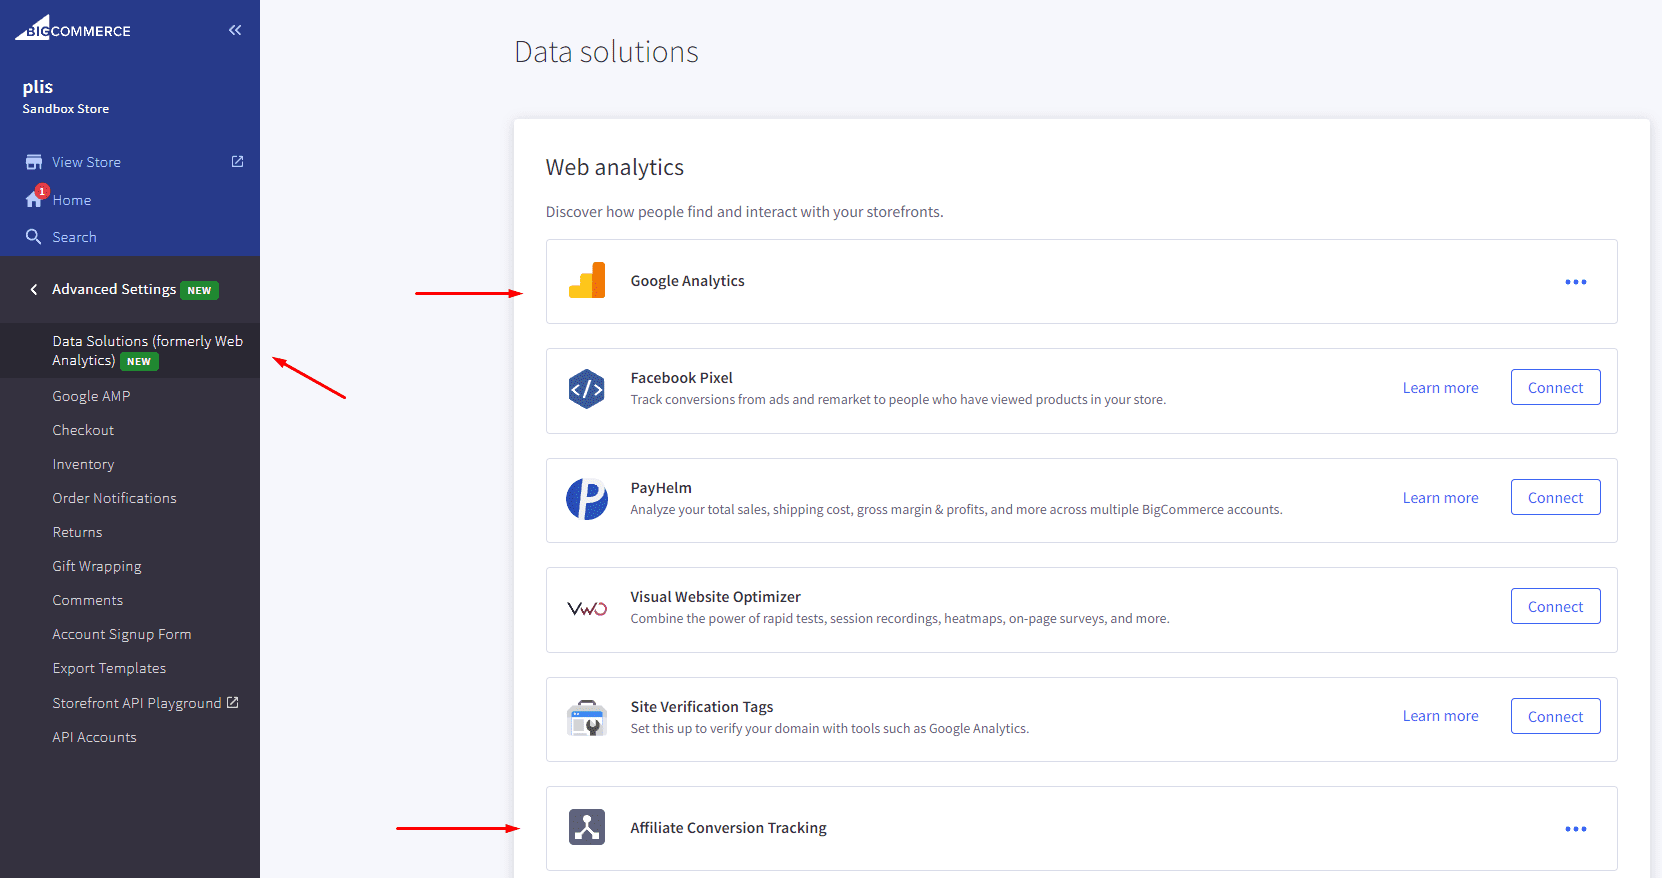
Click on the Advanced Settings tab on the left.
Choose the "Data Solutions" option from the left tab.
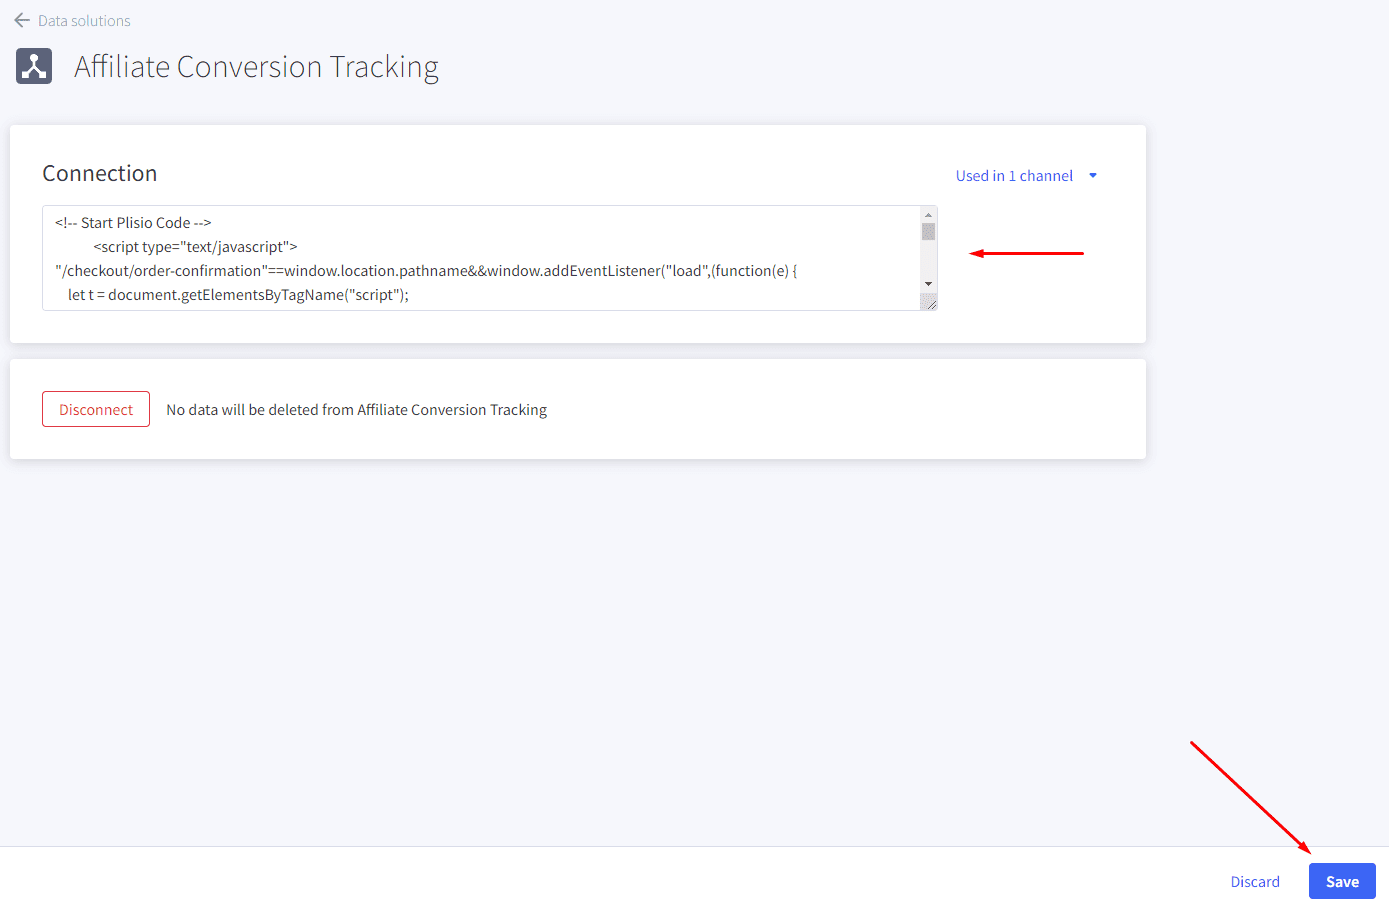
Now Enable "Affiliate Conversion Tracking" and paste the "Affiliate Conversion Tracking snippet" from our guide. (Do not remove/edit anything else in this text box unless you know what you're doing)
Click Save.
Now this time we'll enable the "Google Analytics" Tab.
This part is important: If the Google Analytics text box is completely empty we'll need to put in empty script tags. This is just used as a placeholder so that bigcommerce enables the Google Analytics Pixel we need to get some details from.
<script> </script>
If the "Google Analytics" text box already has something else in it, such as your Google Analytics Scripts, there's no need to put in the above empty script tags, as the other scripts in the text box already enables the Google Analytics Pixel we need. (Please Note: If the "Google Analytics" Pixel is not enabled, during checkout our payment button might fail to properly pass Tax and Shipping Chargers).
Order Page Payment Button:
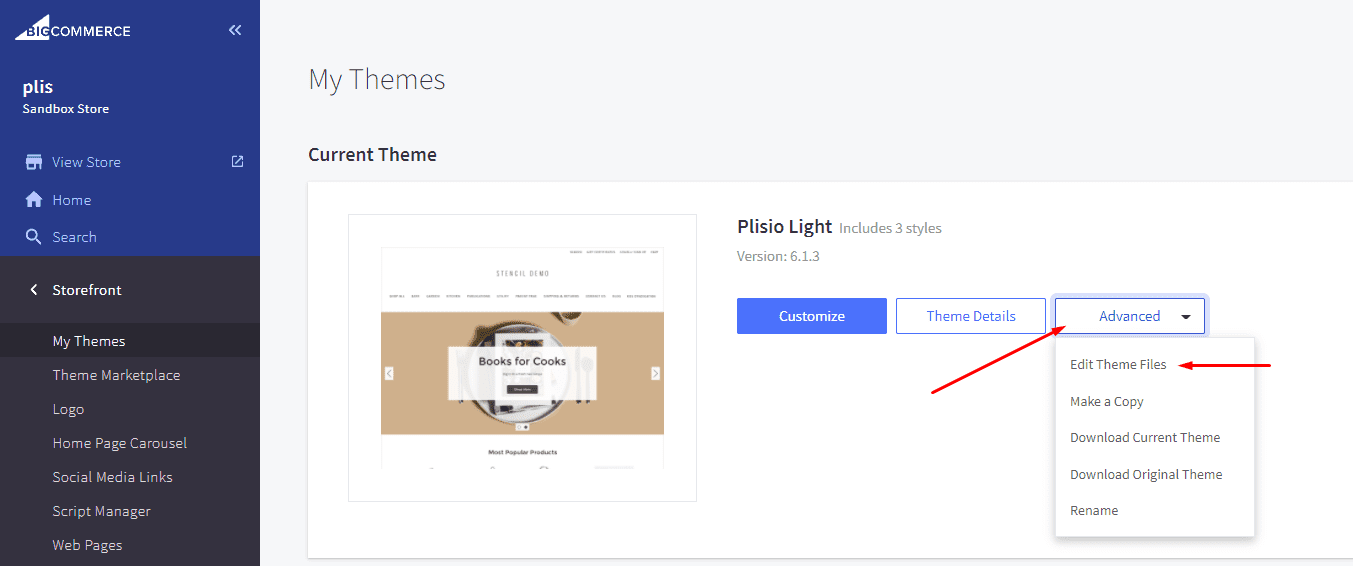
Click on the Storefront tab on the left.
Choose the "My Themes" option from the left tab.
Click on "Make a Copy" for your current theme.
Choose a new theme name, for example “Plisio”, press “Save a Copy”.
Apply the new theme.
Click on the “Advanced” tab of the new theme.
Select "Edit Theme Files" from the dropdown.
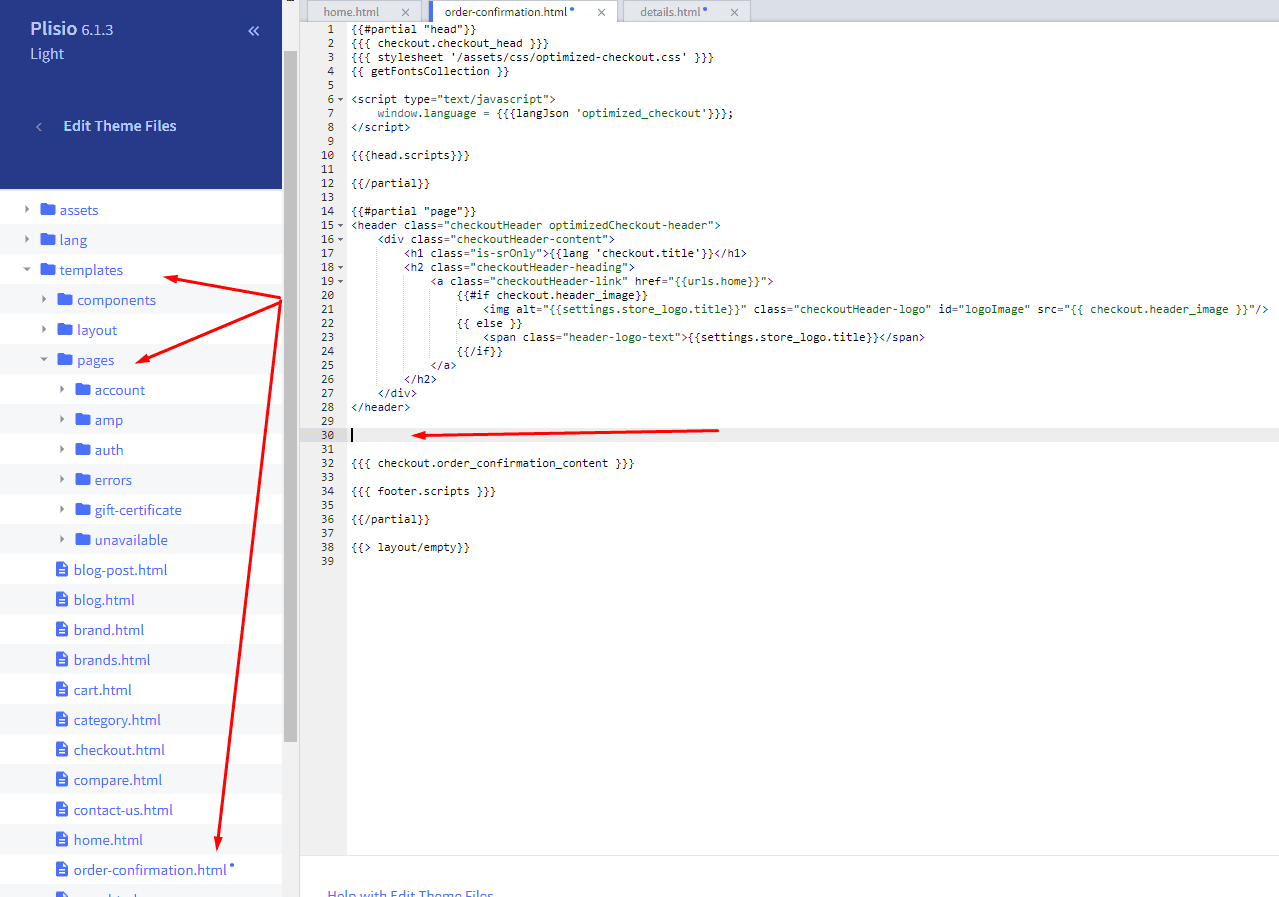
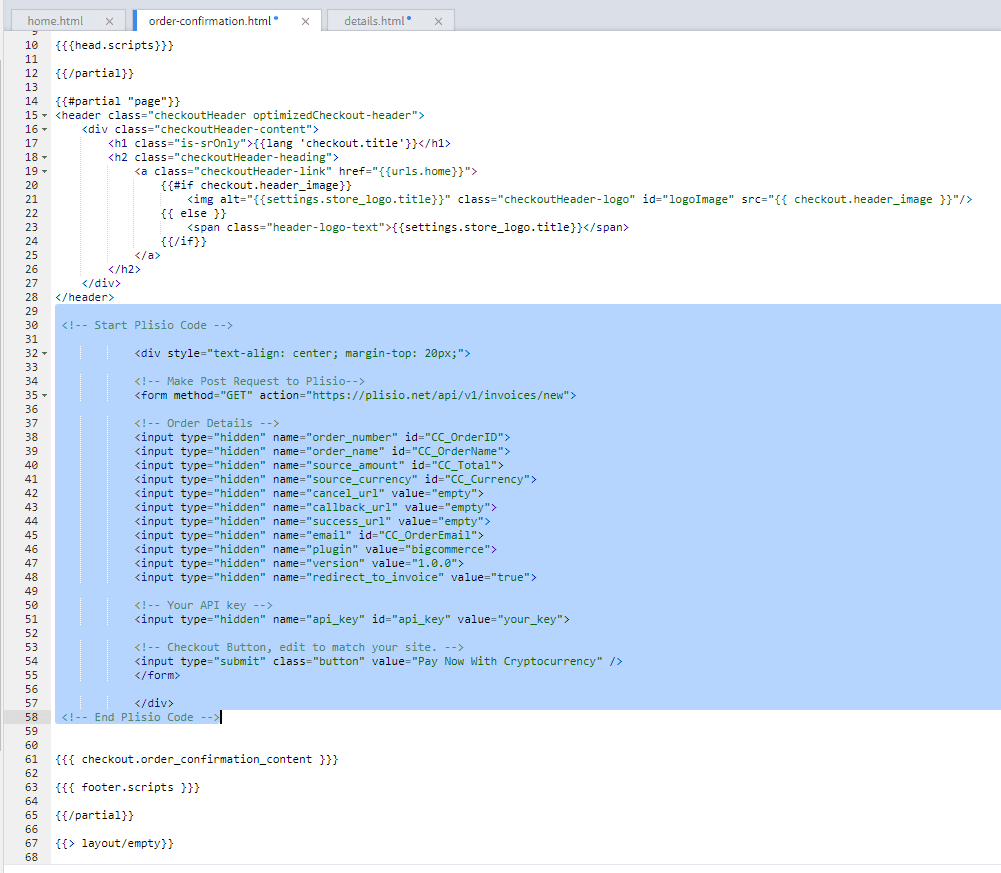
Navigate to the Templates/Pages Folder and open "order-confirmation.html".
Find the line directly above "{{{ checkout.order_confirmation_content }}}."
Paste the "Order Page Payment Button" Script from our guide (don’t forget to change the API key value!).
Press Save.

Option #2: Installing the Button into your Bigcommerce Order History Page.
Click on the Storefront tab on the left.
Choose the "My Themes" option from the left tab.
Click on "Make a Copy" for your current theme.
(If you already made a copy of theme like in option #2 then just skip this part to select “Edit Theme Files”)
Choose new theme name, for example “Plisio”, press “Save a Copy”.
Apply a new theme.
Click on the “Advanced” tab of the new theme.
Select "Edit Theme Files" from the dropdown.
Locate and open: templates/pages/account/orders/details.html
Scroll to the middle of the code.
Locate in the code: < button data-print-invoice="{{ order.invoice_url }}"
Paste the "Order History Page" Script from our guide (don’t forget to change the API key value!) between the < button data-print-invoice=and the < /section> field.
This will add the Plisio payment button to your store.
Press Save.

Testing, Finishing Up and Marking Payments as Received.
You have successfully integrated Plisio into Bigcommerce!
You should generate a test order for your store.Use the Plisio Payment option and go through the entire checkout process to make sure everything works as intended.
Make sure that all installed button options on the Checkout Page and Customer Order History Page work correctly.
Once a customer has submitted a payment for an order, check your wallet to make sure that you’ve received the correct cryptocurrency amount. If everything is in order, mark the payment as received in the Bigcommerce Dashboard so the order could be processed accordingly.
Häufig gestellte Fragen
BigCommerce ist eine E-Commerce-Plattform, die Unternehmen eine Software-as-a-Service-Lösung zum Erstellen und Verwalten eines Online-Shops bietet. Mit BigCommerce können Händler neben anderen E-Commerce-bezogenen Aufgaben einen anpassbaren Online-Shop entwerfen und starten, Inventar verwalten, Zahlungen verarbeiten und Bestellungen ausführen. BigCommerce bietet Funktionen wie Marketing-Tools, Integrationen mit beliebten Zahlungs-Gateways, Versandanbietern und Vertriebskanälen sowie robuste Analyse- und Berichtsfunktionen, was es zu einer All-in-One-Lösung für Unternehmen macht, die ihre Reichweite erweitern und ihre Online-Verkäufe steigern möchten.
Führen Sie die folgenden Schritte aus, um BigCommerce ein Zahlungsgateway hinzuzufügen:
- Melden Sie sich bei Ihrem BigCommerce-Shop-Kontrollfeld an.
- Gehen Sie zum Abschnitt „Store Setup“ und klicken Sie dann auf „Payment“.
- Scrollen Sie nach unten zum Abschnitt „Zahlungsgateway“ und klicken Sie auf die Schaltfläche „Zahlungsgateway hinzufügen“.
- Wählen Sie das Zahlungsgateway aus, das Sie hinzufügen möchten (z. B. Plisio).
- Geben Sie die erforderlichen Informationen für das Zahlungsgateway ein (z. B. API-Anmeldeinformationen, Händlerkontoinformationen).
- Klicken Sie auf die Schaltfläche „Speichern“, um das Hinzufügen des Zahlungsgateways zu Ihrem Shop abzuschließen.
Hinweis: Die spezifischen Schritte zum Hinzufügen eines Zahlungsgateways zu BigCommerce können je nach gewähltem Zahlungsgateway variieren. Möglicherweise müssen Sie zusätzliche Schritte befolgen, die vom Zahlungs-Gateway-Anbieter bereitgestellt werden, um die Integration ordnungsgemäß einzurichten.
Um Bitcoin als Zahlungsoption in Ihrem Bigcommerce-Shop zu akzeptieren, können Sie die folgenden Schritte ausführen:
- Wählen Sie einen Bitcoin-Zahlungsabwickler aus: Es stehen verschiedene Zahlungsabwickler wie BitPay, Coinbase und Plisio zur Verfügung, mit denen Sie Bitcoin-Zahlungen akzeptieren können. Wählen Sie einen Prozessor, der Ihren Geschäftsanforderungen entspricht und sich in Bigcommerce integrieren lässt.
- Integrieren Sie den Zahlungsabwickler in Ihren Bigcommerce-Shop: Befolgen Sie die Anweisungen Ihres Zahlungsabwicklers, um ihn in Ihren Bigcommerce-Shop zu integrieren. Dies beinhaltet normalerweise das Kopieren und Einfügen von Code in die Einstellungen Ihres Bigcommerce-Shops.
- Aktivieren Sie Bitcoin als Zahlungsoption: Aktivieren Sie in den Einstellungen Ihres Bigcommerce-Shops Bitcoin als Zahlungsoption. Auf diese Weise können Kunden Bitcoin als ihre bevorzugte Zahlungsmethode während des Bezahlvorgangs auswählen.
- Überwachen Sie Ihre Bitcoin-Zahlungen: Ihr Zahlungsabwickler stellt Ihnen ein Dashboard zur Verfügung, auf dem Sie Ihre Bitcoin-Zahlungen überwachen und verwalten können. Achten Sie darauf, Ihr Dashboard im Auge zu behalten und Ihre Zahlungen regelmäßig abzugleichen.
Indem Sie diesen Schritten folgen, können Sie damit beginnen, Bitcoin-Zahlungen in Ihrem Bigcommerce-Shop zu akzeptieren.
Ja, Plisio bietet eine Payment-Gateway-Integration für BigCommerce an. Mit dem Plisio-Zahlungsgateway können BigCommerce-Händler mehrere Kryptowährungen als Zahlung von ihren Kunden akzeptieren, darunter Bitcoin, Ethereum, Bitcoin Cash, Litecoin und viele mehr. Um Plisio als Zahlungsgateway in Ihren BigCommerce-Shop zu integrieren, können Sie den Anweisungen von Plisio folgen oder sich an das Support-Team wenden, um Unterstützung zu erhalten.
BigCommerce ist eine E-Commerce-Plattform, die von einer Vielzahl von Unternehmen genutzt wird, von kleinen und mittleren Unternehmen bis hin zu großen Unternehmen. Einige bemerkenswerte Unternehmen, die BigCommerce verwenden, sind:
- Skullcandy
- Toyota
- Ben & Jerry
- Molton Brown
- Kodak
- Sony
- Vodafone
- HP
- YETI
- Paul Mitchell
Dies sind nur einige Beispiele, da es viele andere bekannte Marken und Unternehmen gibt, die BigCommerce für ihre E-Commerce-Anforderungen verwenden.
BigCommerce ist eine E-Commerce-Plattform, die Geld verdient, indem sie ihren Kunden eine monatliche Abonnementgebühr für die Nutzung ihrer Software berechnet und einen Prozentsatz ihrer Verkaufserlöse einnimmt. BigCommerce bietet eine Reihe von Preisplänen an, um Unternehmen unterschiedlicher Größe und Bedürfnisse gerecht zu werden, und der Prozentsatz der Umsatzbeteiligung sinkt mit zunehmender Stufe des Abonnementplans. Zusätzlich zu den Abonnementgebühren und der Umsatzbeteiligung bietet BigCommerce auch zusätzliche kostenpflichtige Dienste und Add-Ons an, wie z. B. professionelle Designdienste, Marketing- und SEO-Tools sowie Integrationen mit anderen Softwareanwendungen.
Laden Sie das BigCommerce-Plugin herunter
Und fangen Sie jetzt an, Kryptowährungen zu akzeptieren
Melden Sie sich kostenlos mit 2 Klicks an • Einfache Einrichtung in 2 Minuten • Technischer Support rund um die Uhr