10以上の統合ガイド
直接支払い
私たちはあなたの財布に直接支払いを送金します(私たちはクライアントのお金を保持しません)。
KYCなし
プラグインの使用を開始するために KYC を完了する必要はありません。プロセス中にサードパーティのアカウントはありません。自分のウォレットを使用してください。
無制限
無制限の数のリクエストを作成できます。
世界中の暗号通貨を受け入れる
ユーザーに国の制限はありません。このプラグインは世界中で利用できます。


誰もが 暗号通貨の支払いを受け入れることができます
シンプルです
最低料金
暗号通貨と法定通貨
どうやって始めるのか
In this article we will walk you through integrating Plisio into your Bigcommerce Store, as well as summarize some of the benefits of accepting cryptocurrencies. We’ve also prepared a guide for you on how to integrate a cryptocurrency payment into your website.
Now that we've discussed the benefits of accepting Cryptocurrency and choosing Plisio, let's take a look at how to integrate Plisio into Bigcommerce.
What we expect from the integration:
There are several ways of integrating Plisio into the Bigcommerce platform. While we’re on it, we want to make sure that all of our integrations meet a few requirements, and also warn you about some pitfalls.
- We would like to keep all of our orders inside of Bigcommerce’s platform. This includes using Bigcommerce’s checkout option to securely generate the order, collect the buyer’s info, calculate shipping costs and taxes, offer discounts or coupon codes, etc.
- We would also want your customers to be able to review their order history that will be kept in our Bigcommerce store.
- We want to keep the “Pending Payment'' status of your order until we can manually verify that we have received the crypto payment. This will allow us to make sure that all Blockchain confirmations are received before changing the order status to “payment received”.
- We want to be able to use our standard Shipping and Bookkeeping integrations for Bigcommerce, without requiring any additional plugins or software to add Plisio to our store.
The pitfalls:
- One of the Bigcommerce’s cons is that they do not offer any cryptocurrency payment options for merchants. This can be resolved with a custom code that will allow you to integrate your own Payment Gateway into the Checkout process.
- Unfortunately, Bigcommerce's new Stencil Theme does not allow merchants to directly customize or add code/scripts to the checkout process. They have mentioned adding the customization option in the future, but for now it is on hold. So we’ve got to get creative to get around this.
- We’ll need to be able to securely send the order information such as the order ID and the Order Total (Price) to the Plisio Platform while making sure there are no wrong order details sent.
Our Two Integration Options for Bigcommerce
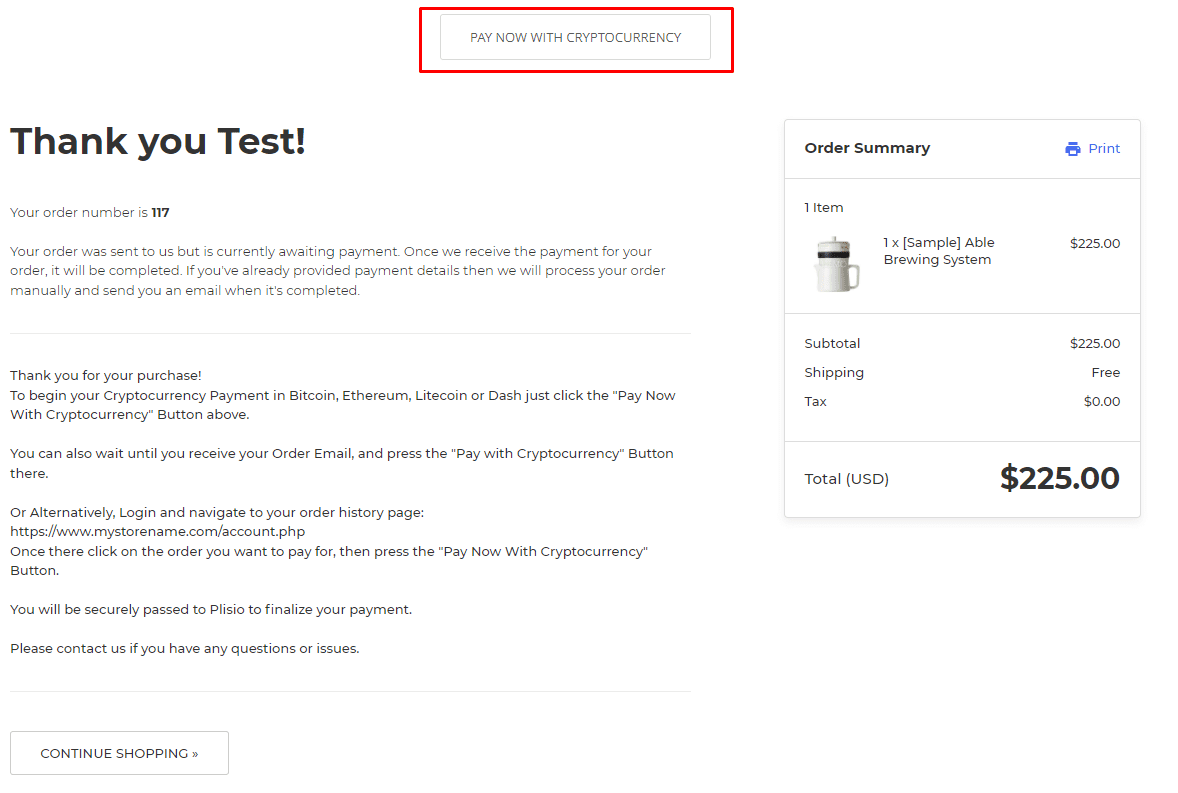
Option #1: Install a "Pay With Cryptocurrency" Button to the Order Confirmation Page, allowing the customer to make payment while checking out.
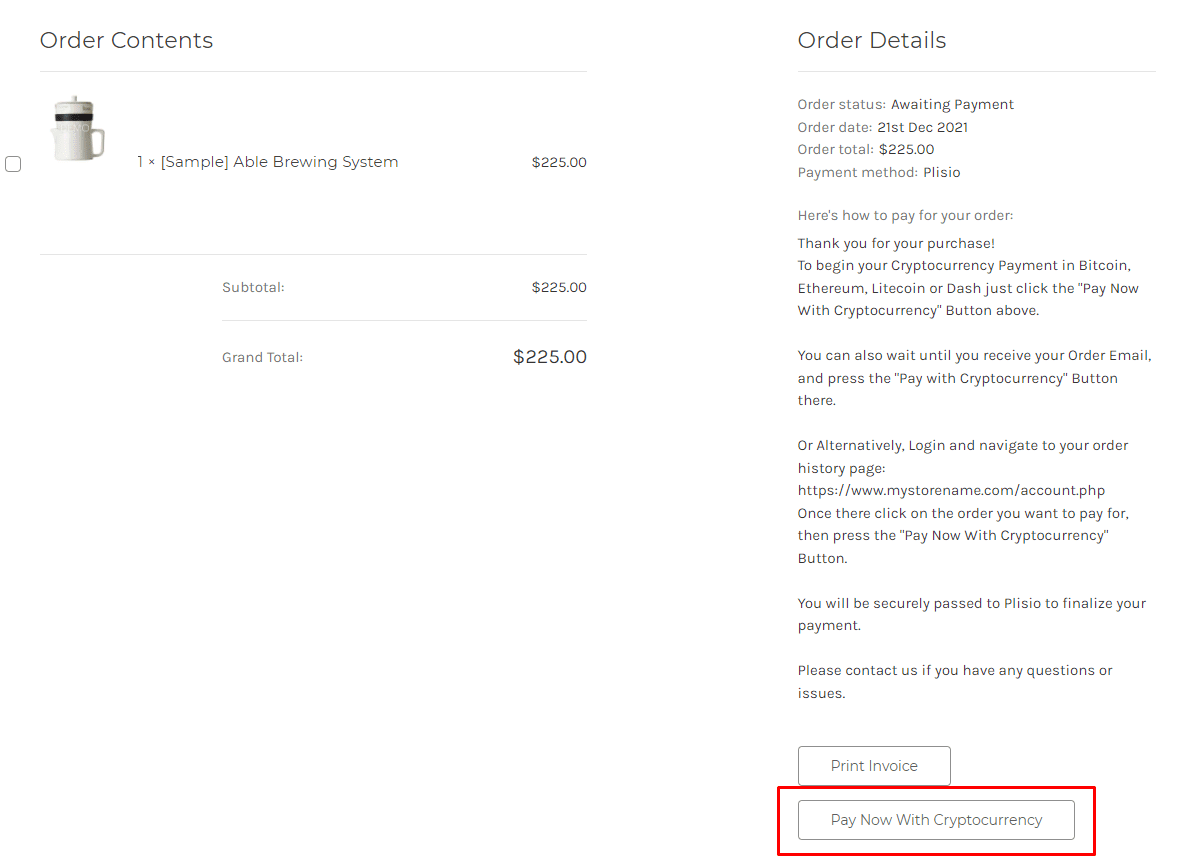
Option #2: Or install a "Pay With Cryptocurrency" Button to the Customer Dashboard, so that they can pay from their order history page.
In this guide, we will show you how to integrate these two options: Although you will only need the option #1, the other option suggests a back-up in case the customer’s payment fails in the first attempt. With this option, they can reattempt the payment for the second time. You can integrate one of the two options you prefer.

Create a Plisio payment option on Bigcommerce
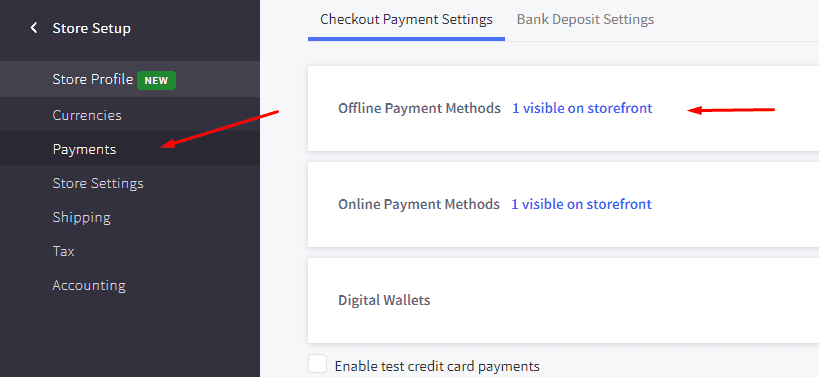
- Log into your Bigcommerce Admin Dashboard.
- Click on "Store Setup" located on the left.
- Select one from the available “Payments” options.
- Locate the “Offline Payment Methods” option located on the page top.
- Slide to the “Bank Deposit”.
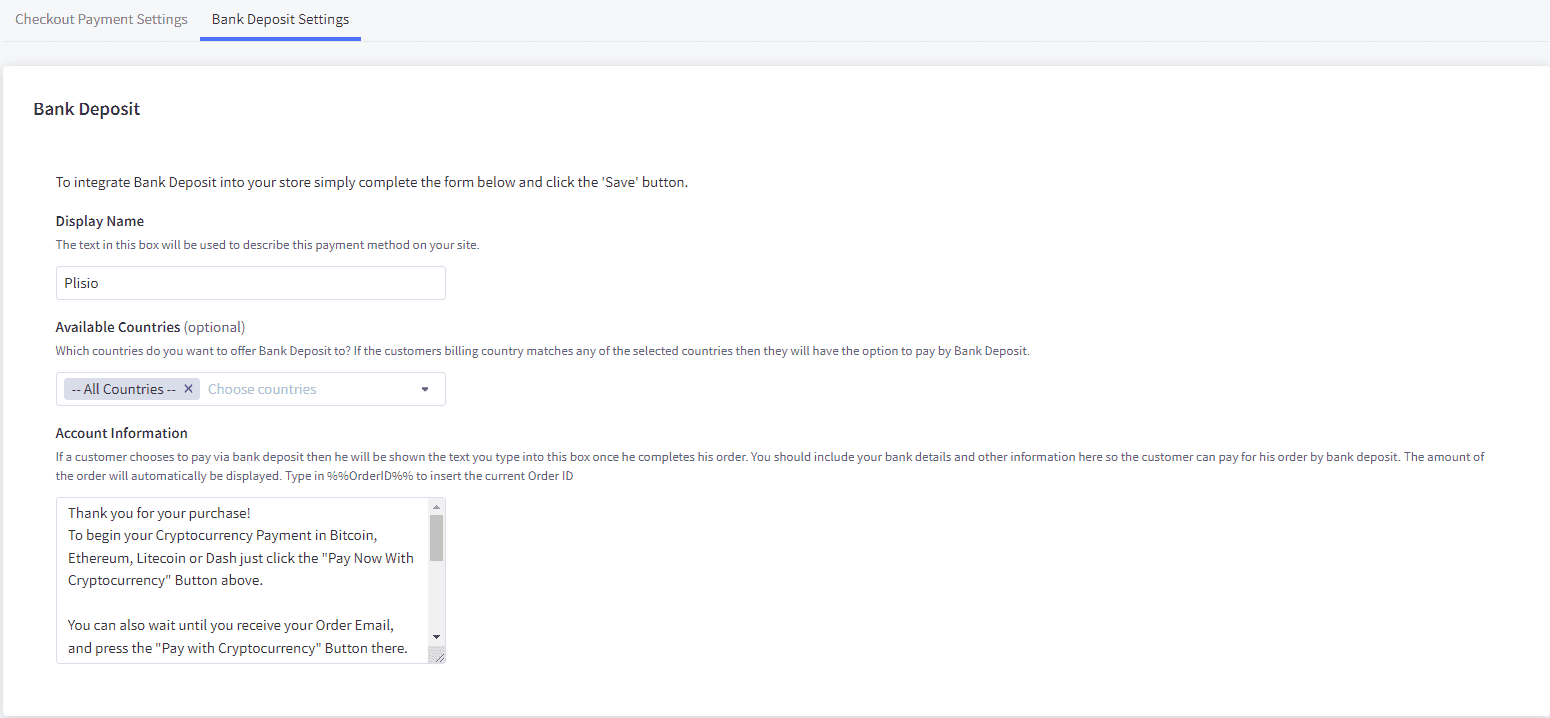
- Select the "Bank Deposit Settings" tab on the page top.
- Fill out the details as desired for your store.
Our example:
Display Name:
Plisio
Available Countries:
All Countries
Payment instructions:
Thank you for your purchase!
To begin your Cryptocurrency Payment in Bitcoin, Ethereum, Litecoin or Dash just click the "Pay With
Cryptocurrency now" button.
You can also wait until you receive your Order Email, and click on the "Pay with Cryptocurrency" Button there.
Or Alternatively, Login and navigate to your order history page: https://www.mystorename.com/account.php
Once there, click on the order you want to pay for, then press the "Pay Now With Cryptocurrency" Button.
You will be securely redirected to Plisio to finish your payment.
Please contact us if you have any questions or difficulties.


Option #1: Installing the Button to your Bigcommerce Checkout Page.
Log into your Bigcommerce Admin Dashboard.
Conversion Tracking Snippet:
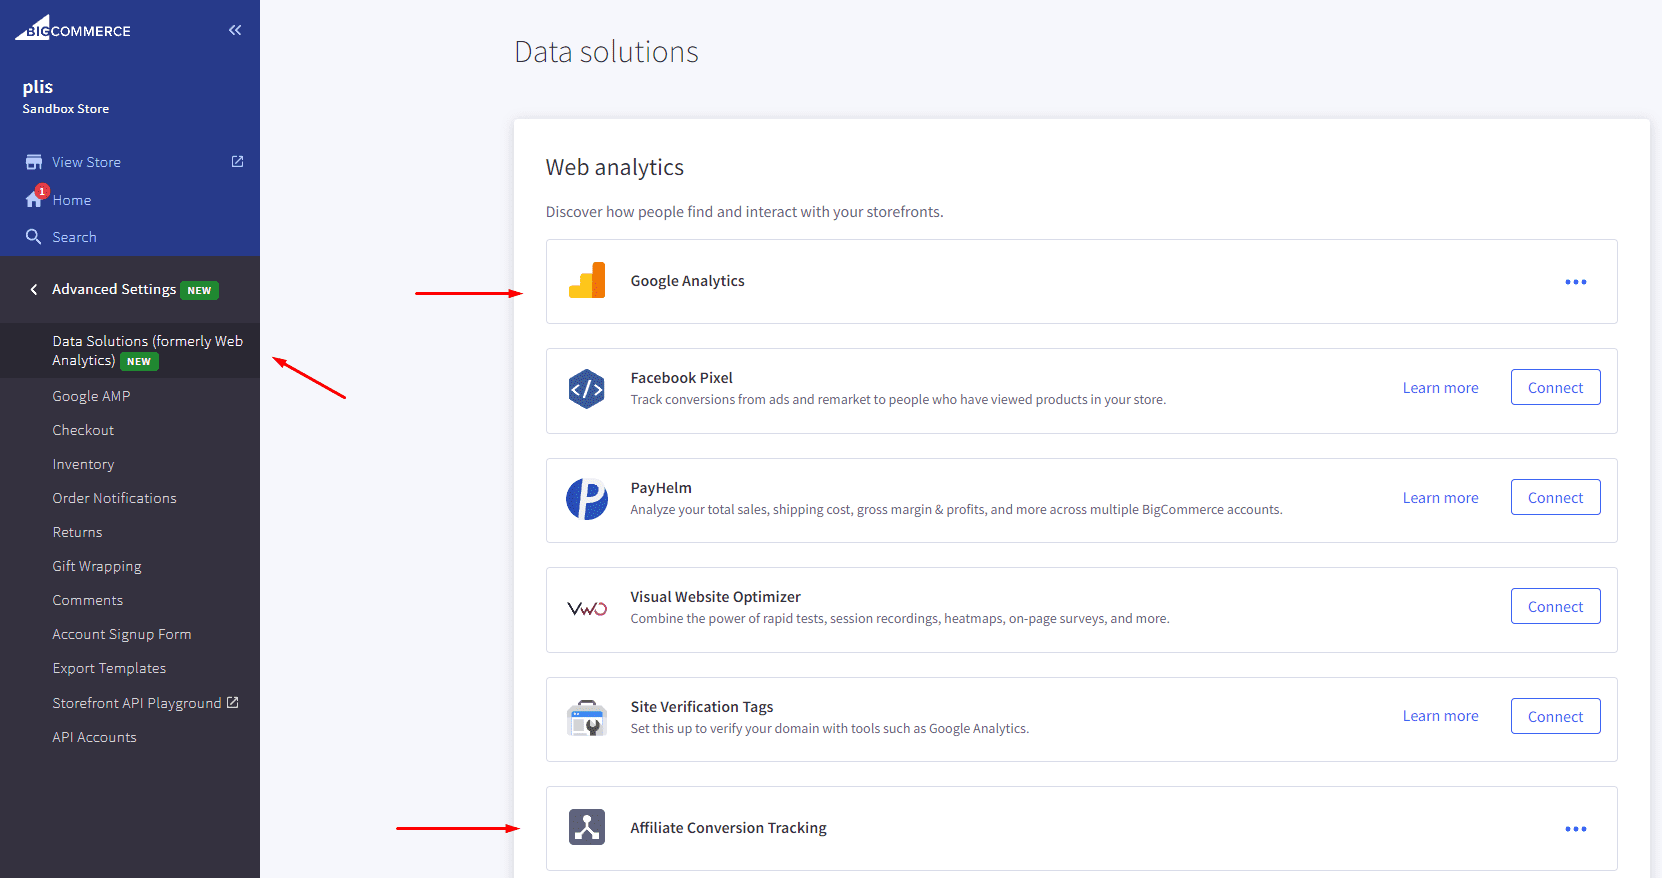
Click on the Advanced Settings tab on the left.
Choose the "Data Solutions" option from the left tab.
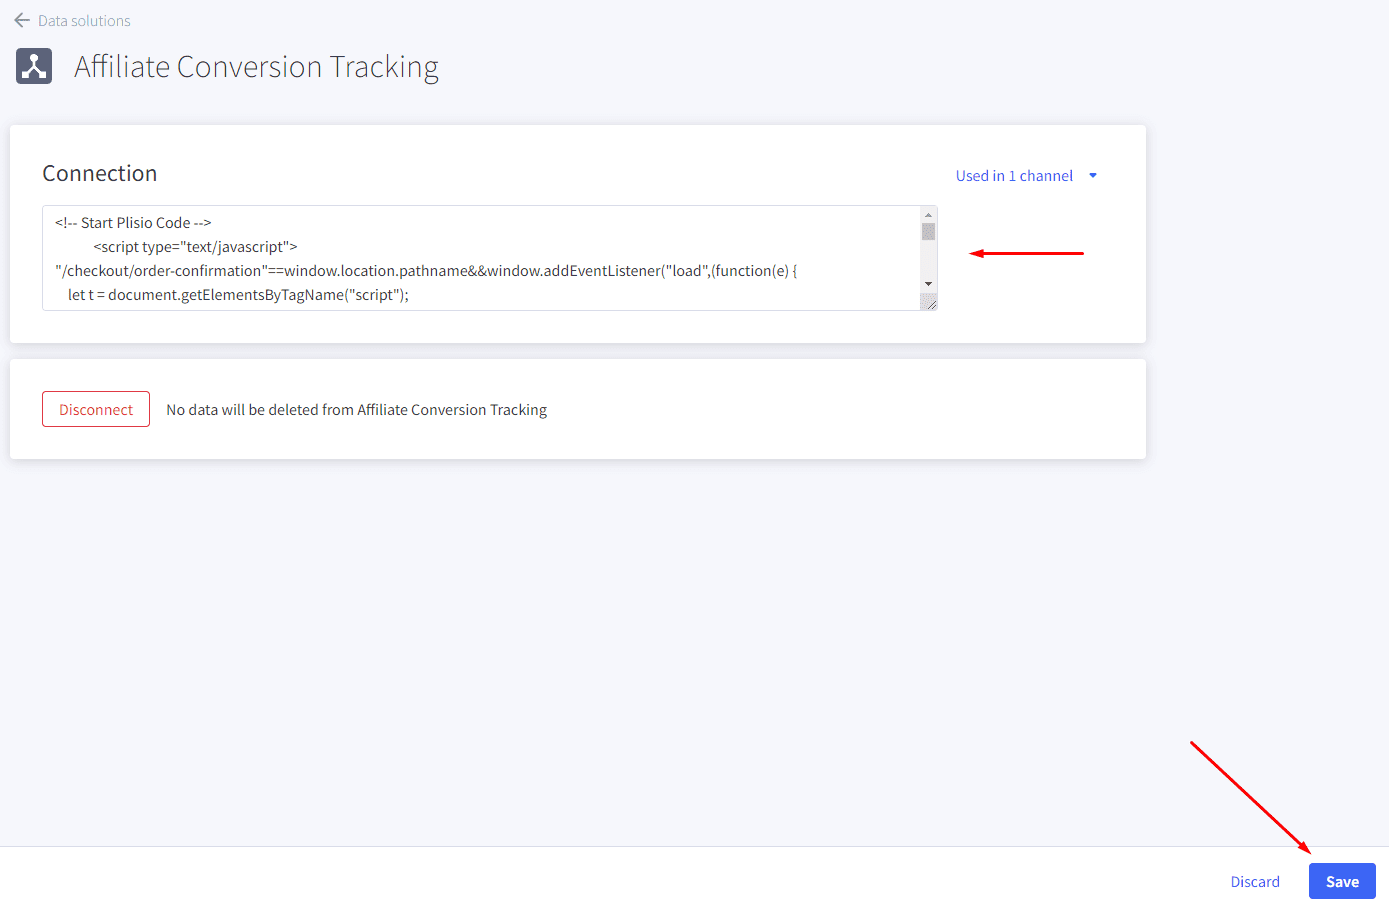
Now Enable "Affiliate Conversion Tracking" and paste the "Affiliate Conversion Tracking snippet" from our guide. (Do not remove/edit anything else in this text box unless you know what you're doing)
Click Save.
Now this time we'll enable the "Google Analytics" Tab.
This part is important: If the Google Analytics text box is completely empty we'll need to put in empty script tags. This is just used as a placeholder so that bigcommerce enables the Google Analytics Pixel we need to get some details from.
<script> </script>
If the "Google Analytics" text box already has something else in it, such as your Google Analytics Scripts, there's no need to put in the above empty script tags, as the other scripts in the text box already enables the Google Analytics Pixel we need. (Please Note: If the "Google Analytics" Pixel is not enabled, during checkout our payment button might fail to properly pass Tax and Shipping Chargers).
Order Page Payment Button:
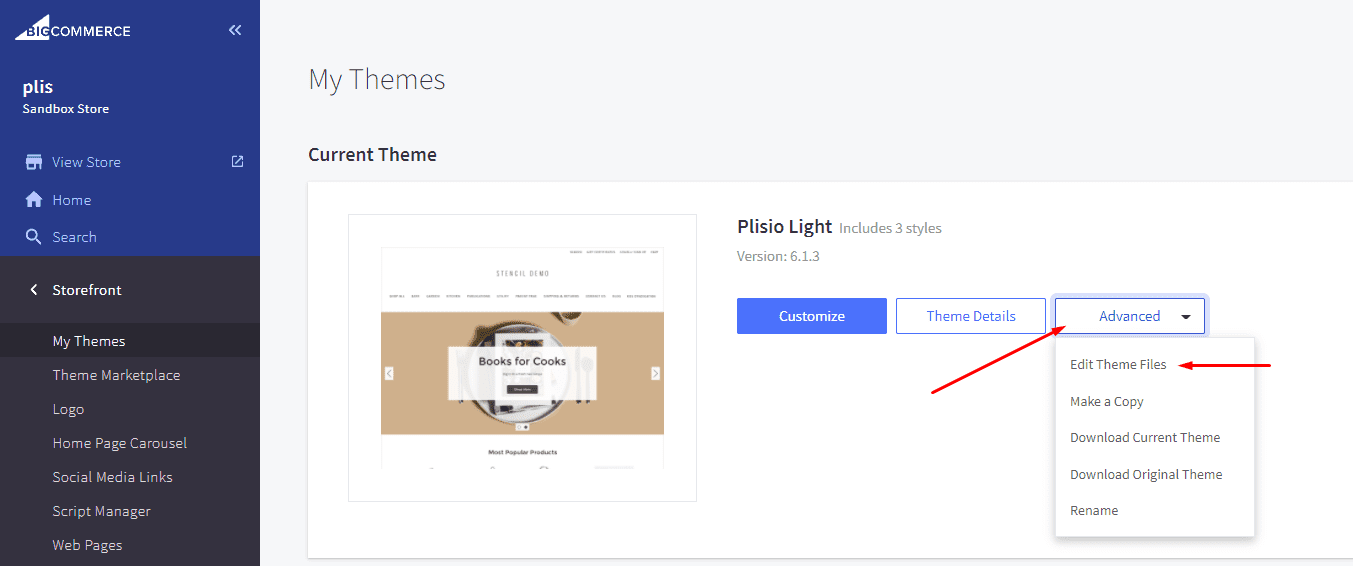
Click on the Storefront tab on the left.
Choose the "My Themes" option from the left tab.
Click on "Make a Copy" for your current theme.
Choose a new theme name, for example “Plisio”, press “Save a Copy”.
Apply the new theme.
Click on the “Advanced” tab of the new theme.
Select "Edit Theme Files" from the dropdown.
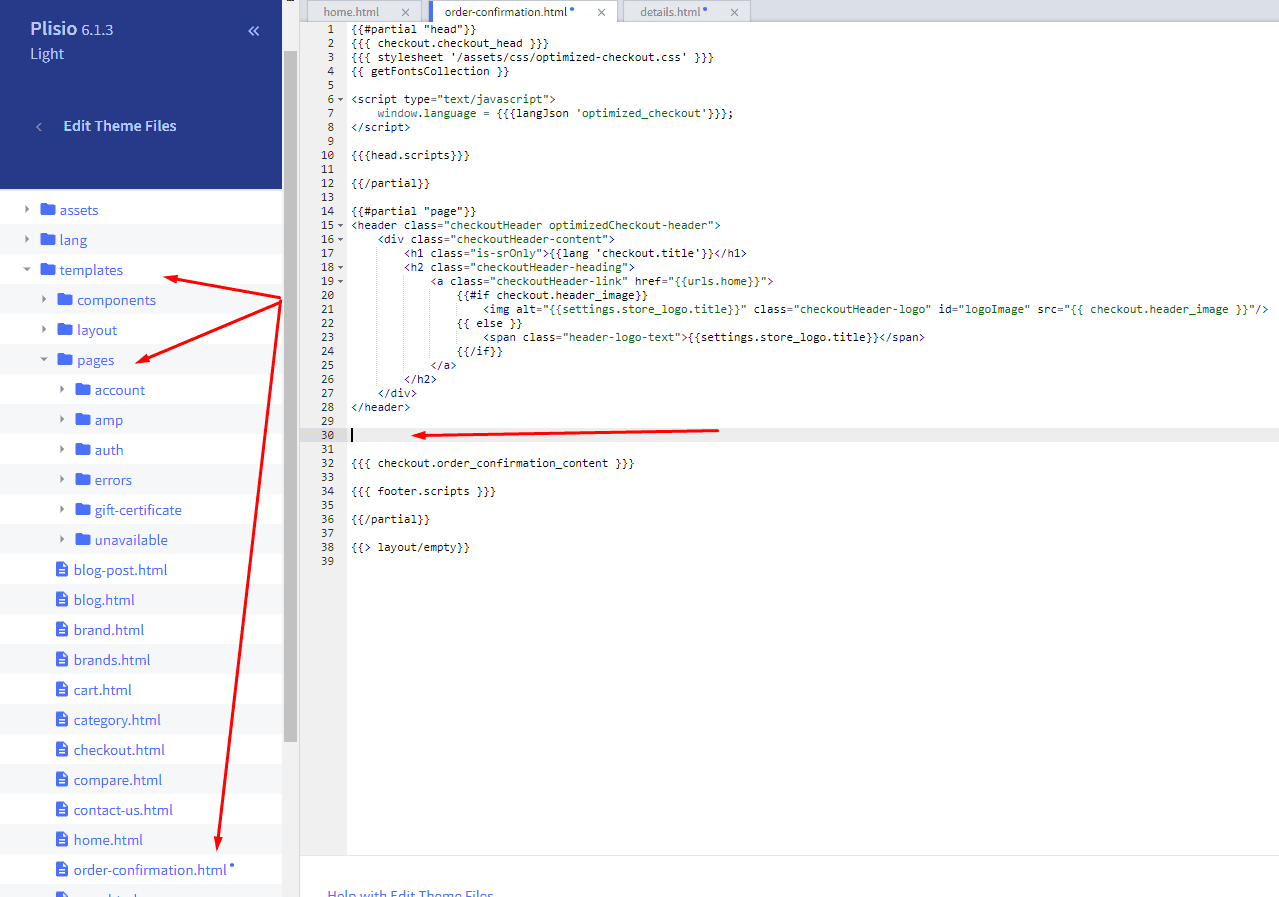
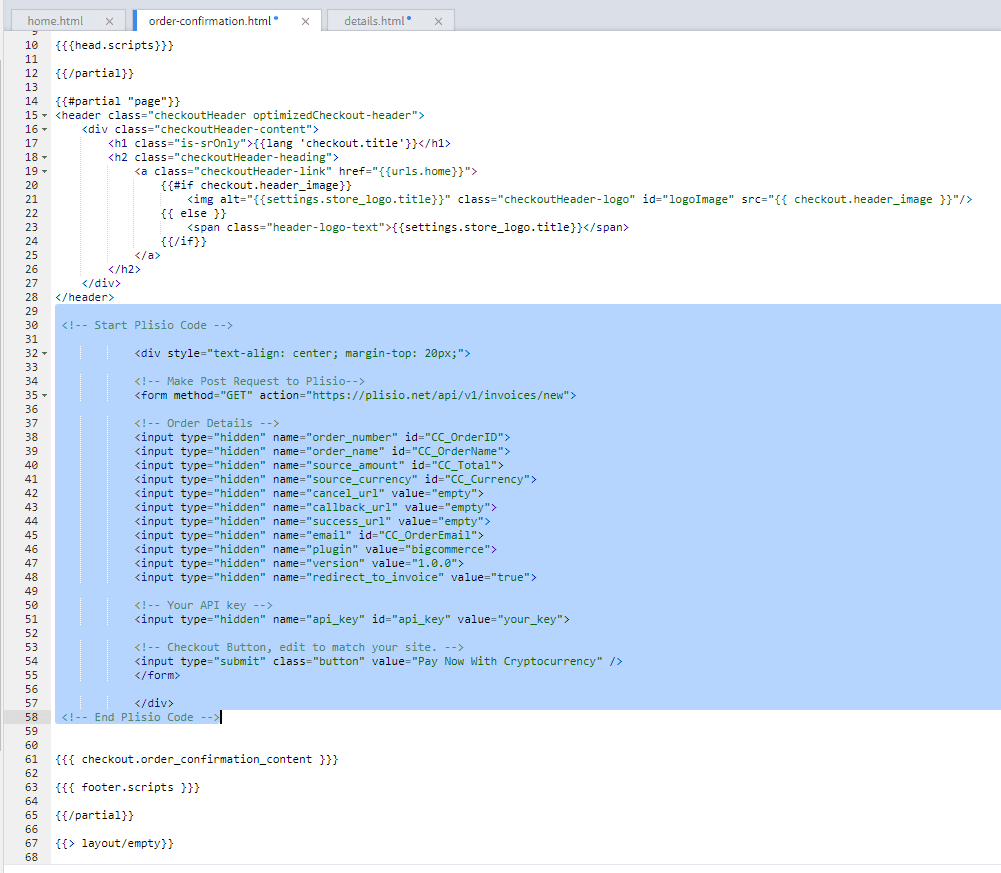
Navigate to the Templates/Pages Folder and open "order-confirmation.html".
Find the line directly above "{{{ checkout.order_confirmation_content }}}."
Paste the "Order Page Payment Button" Script from our guide (don’t forget to change the API key value!).
Press Save.

Option #2: Installing the Button into your Bigcommerce Order History Page.
Click on the Storefront tab on the left.
Choose the "My Themes" option from the left tab.
Click on "Make a Copy" for your current theme.
(If you already made a copy of theme like in option #2 then just skip this part to select “Edit Theme Files”)
Choose new theme name, for example “Plisio”, press “Save a Copy”.
Apply a new theme.
Click on the “Advanced” tab of the new theme.
Select "Edit Theme Files" from the dropdown.
Locate and open: templates/pages/account/orders/details.html
Scroll to the middle of the code.
Locate in the code: < button data-print-invoice="{{ order.invoice_url }}"
Paste the "Order History Page" Script from our guide (don’t forget to change the API key value!) between the < button data-print-invoice=and the < /section> field.
This will add the Plisio payment button to your store.
Press Save.

Testing, Finishing Up and Marking Payments as Received.
You have successfully integrated Plisio into Bigcommerce!
You should generate a test order for your store.Use the Plisio Payment option and go through the entire checkout process to make sure everything works as intended.
Make sure that all installed button options on the Checkout Page and Customer Order History Page work correctly.
Once a customer has submitted a payment for an order, check your wallet to make sure that you’ve received the correct cryptocurrency amount. If everything is in order, mark the payment as received in the Bigcommerce Dashboard so the order could be processed accordingly.
よくある質問
BigCommerce は、オンライン ストアを作成および管理するためのサービスとしてのソフトウェア ソリューションを企業に提供する e コマース プラットフォームです。 BigCommerce を使用すると、マーチャントはカスタマイズ可能なオンライン ストアの設計と立ち上げ、在庫の管理、支払いの処理、注文の履行など、e コマース関連のタスクを実行できます。 BigCommerce は、マーケティング ツール、一般的な支払いゲートウェイ、配送業者、販売チャネルとの統合、堅牢な分析およびレポート機能などの機能を提供し、リーチの拡大とオンライン販売の拡大を目指す企業向けのオールインワン ソリューションとなっています。
支払いゲートウェイを BigCommerce に追加するには、次の手順に従います。
- BigCommerce ストアのコントロール パネルにログインします。
- 「ストア設定」セクションに移動し、「支払い」をクリックします。
- 「Payment Gateway」セクションまでスクロールし、「Add a Payment Gateway」ボタンをクリックします。
- 追加する支払いゲートウェイを選択します (例: Plisio)。
- 支払いゲートウェイに必要な情報を入力します (例: API 資格情報、マーチャント アカウント情報)。
- [保存] ボタンをクリックして、ストアへの支払いゲートウェイの追加を完了します。
注: 支払いゲートウェイを BigCommerce に追加する具体的な手順は、選択した支払いゲートウェイによって異なる場合があります。統合を適切に設定するには、支払いゲートウェイ プロバイダーが提供する追加の手順に従う必要がある場合があります。
Bigcommerce ストアでビットコインを支払いオプションとして受け入れるには、次の手順に従います。
- ビットコイン支払い処理業者を選択する: BitPay、Coinbase、Plisio など、ビットコイン支払いを受け入れることができるさまざまな支払い処理業者があります。ビジネス ニーズを満たし、Bigcommerce と統合するプロセッサを選択してください。
- 支払い処理業者を Bigcommerce ストアと統合する: 支払い処理業者から提供される指示に従って、Bigcommerce ストアと統合します。これには通常、いくつかのコードをコピーして Bigcommerce ストアの設定に貼り付ける必要があります。
- 支払いオプションとしてビットコインを有効にする: Bigcommerce ストアの設定で、ビットコインを支払いオプションとして有効にします。これにより、顧客はチェックアウト時に好みの支払い方法としてビットコインを選択できます。
- ビットコインの支払いを監視する: 支払い処理業者は、ビットコインの支払いを監視および管理できるダッシュボードを提供します。ダッシュボードに目を光らせ、定期的に支払いを調整してください。
これらの手順に従うことで、Bigcommerce ストアでビットコイン支払いの受け入れを開始できます。
はい、Plisio は BigCommerce の支払いゲートウェイ統合を提供しています。 Plisio 支払いゲートウェイを使用すると、BigCommerce 加盟店は、ビットコイン、イーサリアム、ビットコイン キャッシュ、ライトコインなど、複数の暗号通貨を顧客からの支払いとして受け入れることができます。 Plisio を BigCommerce ストアの支払いゲートウェイとして統合するには、Plisio が提供する指示に従うか、サポート チームに連絡して支援を求めることができます。
BigCommerce は、中小企業から大企業まで幅広い企業に利用されている EC プラットフォームです。 BigCommerce を使用する注目すべき企業には次のようなものがあります。
- Skullcandy
- Toyota
- Ben & Jerry
- Molton Brown
- Kodak
- Sony
- Vodafone
- HP
- YETI
- Paul Mitchell
e コマースのニーズに BigCommerce を使用する有名なブランドや企業は他にも多数あるため、これらはほんの一例です。
BigCommerce は、ソフトウェアの使用に対して顧客に毎月のサブスクリプション料金を請求し、売上の一部を受け取ることによって収益を上げる e コマース プラットフォームです。 BigCommerce は、さまざまな規模とニーズのビジネスに対応するためのさまざまな料金プランを提供しており、サブスクリプション プランの階層が上がるにつれて、収益分配率が低下します。サブスクリプション料金と収益分配に加えて、BigCommerce は、プロのデザイン サービス、マーケティングおよび SEO ツール、他のソフトウェア アプリケーションとの統合など、追加の有料サービスとアドオンも提供します。
BigCommerce プラグインをダウンロード
そして、今すぐ暗号通貨の受け入れを開始してください
2クリックで無料登録 • 2分で簡単セットアップ • 年中無休の技術サポート